
使用 Three.js 创建你的第一个三维场景
首先我们需要配置一下本地环境以运行 Three.js。像书中说的那样,需要一款支持 JavaScript 的文本编辑器,以及一个本地 Web 服务器。
因为自己的博客就是使用的 ASP.NET 写的,所以我这边就直接使用本地的 ASP.NET 工程了。VS 已经集成了 JavaScript 编辑环境和 IIS 服务器,非常方便。
1. 搭建 HTML 框架
如代码清单 1.1 所示,是一个空的 HTML 框架。其中引入了 three.js 库;还引入了 TrackballControls.js,它用于相机控制交互。此外还包含了一个用于显示 Three.js 场景的 div 元素。
- @{
- ViewData["Title"] = "Example 01.01 - Basic skeleton";
- }
- <script type="text/javascript" charset="utf-8" src="~/lib/three/three.js"></script>
- <script type="text/javascript" charset="utf-8" src="~/lib/three/controls/TrackballControls.js"></script>
- <script type="text/javascript" charset="utf-8" src="~/src/chapter-01/js/01-01.js"></script>
- <!-- Div which will hold the Output -->
- <div id="webgl-output"></div>
- <script type="text/javascript">
- (function () {
- // contains the code for the example
- init();
- })();
- </script>
代码清单 1.2 是 01-01.js 的内容,它打印 Three.js 库的版本号。
- function init() {
- console.log("Using Three.js version: " + THREE.REVISION);
- }
如图 1 所示,我们可以在控制台里看到打印的结果。

2. 渲染并查看三维对象
现在我们改写上一节的 init 函数,创建一个场景,并往场景里添加几个物体。
- function init() {
- // create a scene, that will hold all our elements such as objects, cameras and lights.
- var scene = new THREE.Scene();
- // create a camera, which defines where we're looking at.
- var camera = new THREE.PerspectiveCamera(45, window.innerWidth / window.innerHeight, 0.1, 1000);
- // create a render and set the size
- var renderer = new THREE.WebGLRenderer();
- renderer.setClearColor(new THREE.Color(0x000000));
- renderer.setSize(window.innerWidth, window.innerHeight);
- // show axes in the screen
- var axes = new THREE.AxesHelper(20);
- scene.add(axes);
- // create the ground plane
- var planeGeometry = new THREE.PlaneGeometry(60, 20);
- var planeMaterial = new THREE.MeshBasicMaterial({
- color: 0xAAAAAA
- });
- var plane = new THREE.Mesh(planeGeometry, planeMaterial);
- // rotate and position the plane
- plane.rotation.x = -0.5 * Math.PI;
- plane.position.set(15, 0, 0);
- // add the plane to the scene
- scene.add(plane);
- // create a cube
- var cubeGeometry = new THREE.BoxGeometry(4, 4, 4);
- var cubeMaterial = new THREE.MeshBasicMaterial({
- color: 0xFF0000,
- wireframe: true
- });
- var cube = new THREE.Mesh(cubeGeometry, cubeMaterial);
- // position the cube
- cube.position.set(-4, 3, 0);
- // add the cube to the scene
- scene.add(cube);
- // create a sphere
- var sphereGeometry = new THREE.SphereGeometry(4, 20, 20);
- var sphereMaterial = new THREE.MeshBasicMaterial({
- color: 0x777FF,
- wireframe: true
- });
- var sphere = new THREE.Mesh(sphereGeometry, sphereMaterial);
- // position the sphere
- sphere.position.set(20, 4, 2);
- // add the sphere to the scene
- scene.add(sphere);
- // position and point the camera to the center of the scene
- camera.position.set(-30, 40, 30);
- camera.lookAt(scene.position);
- // add the output of renderer to the html element
- document.getElementById("webgl-output").appendChild(renderer.domElement);
- // render the scene
- renderer.render(scene, camera);
- }
编辑器对于 JS 的自动补齐支持的不太好。
本地使用 import 命令能解决一部分补齐:
import * as THREE from '../../../lib/three/three.js'
我们看到最后第 67 行,可以有一个总体上的感知:渲染器跟场景和相机有关。场景告知我们需要渲染什么物体,相机告诉我们从哪里观察物体。
THREE.PerspectiveCamera(fov, aspect, near, far)
fov:视角。
aspect:视口宽高比,表示渲染结果输出画布的宽高比。
near:近平面距离,表示相机能够看到的最近距离。在此距离内的物体将不会被渲染。
far:远平面距离,表示相机能够看到的最远距离。在此距离外的物体也将不会被渲染。
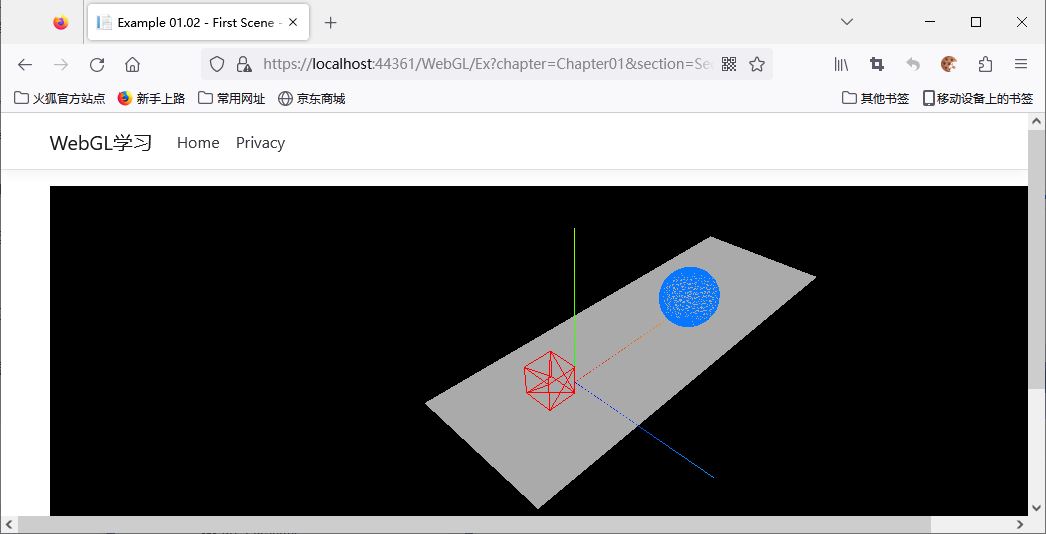
场景中我们会添加一个平面,注意它会绕 x 轴逆时针旋转 90 度;还添加一个方块和球体。为了方便调试查看物体摆放的位置,场景中还添加了一个坐标轴。
Three.js 坐标系的原点位于场景中心。X轴向右为正,Y轴向上为正,Z轴指向屏幕外侧为正。
AxesHelper 中的红轴为 X 轴,绿轴为 Y 轴,蓝轴为 Z 轴。
在 Three.js 中物体都通过 THREE.Mesh 表示,代表一个网络模型。它由两部分组成:几何体和材质。几何体包括形状信息,可以理解成顶点、块面这些信息;而材质包括了外观信息,可以理解成颜色、纹理这些信息。
最终的运行结果如图 2 所示,我们可以从图中感受和核对代码的逻辑。同时可以修改代码中的参数,结合结果进一步理解参数含义。
3. 添加材质、光源和阴影效果
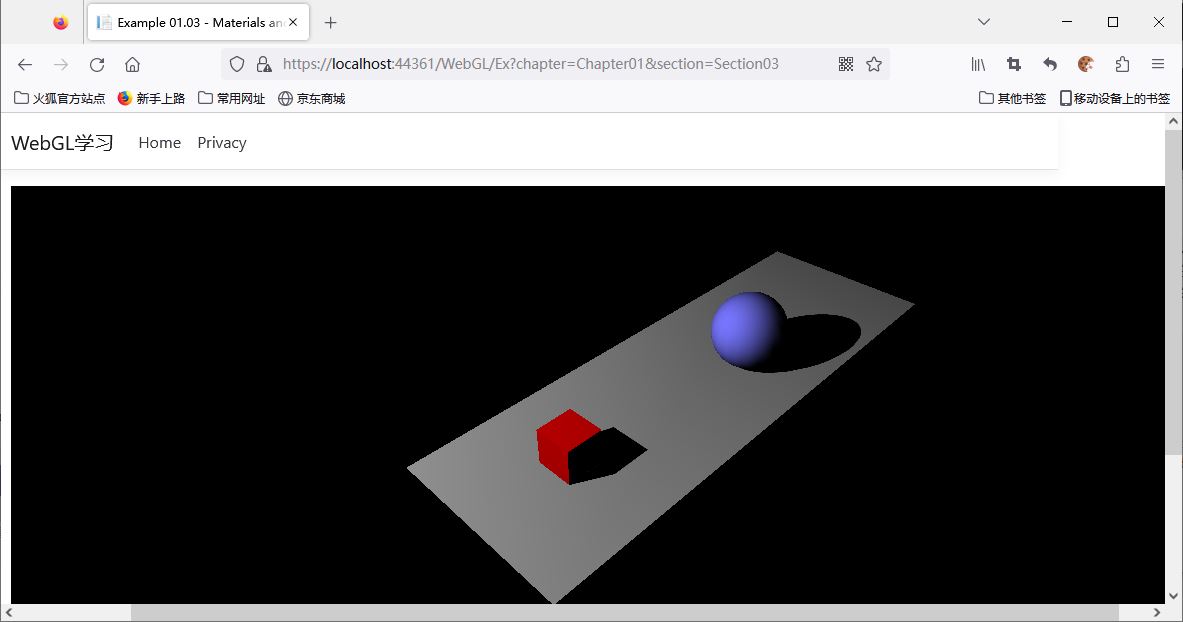
在代码清单 3 中,我们添加了一个点光源 THREE.SpotLight。上一节中的默认材质不能反应光源,此处我们将物体材质改为兰伯特材质。兰伯特材质反应的光线强度与入射光线和表面法向量的夹角相关。
- function init() {
- // create a scene, that will hold all our elements such as objects, cameras and lights.
- var scene = new THREE.Scene();
- // create a camera, which defines where we're looking at.
- var camera = new THREE.PerspectiveCamera(45, window.innerWidth / window.innerHeight, 0.1, 1000);
- // create a render and configure it with shadows
- var renderer = new THREE.WebGLRenderer();
- renderer.setClearColor(new THREE.Color(0x000000));
- renderer.setSize(window.innerWidth, window.innerHeight);
- renderer.shadowMap.enabled = true;
- // create a cube
- var cubeGeometry = new THREE.BoxGeometry(4, 4, 4);
- var cubeMaterial = new THREE.MeshLambertMaterial({
- color: 0xFF0000
- });
- var cube = new THREE.Mesh(cubeGeometry, cubeMaterial);
- cube.castShadow = true;
- // position the cube
- cube.position.x = -4;
- cube.position.y = 2;
- cube.position.z = 0;
- // create a sphere
- var sphereGeometry = new THREE.SphereGeometry(4, 20, 20);
- var sphereMaterial = new THREE.MeshLambertMaterial({
- color: 0x7777ff
- });
- var sphere = new THREE.Mesh(sphereGeometry, sphereMaterial);
- // position the sphere
- sphere.position.x = 20;
- sphere.position.y = 4;
- sphere.position.z = 2;
- sphere.castShadow = true;
- // create the ground plane
- var planeGeometry = new THREE.PlaneGeometry(60, 20);
- var planeMaterial = new THREE.MeshLambertMaterial({
- color: 0xAAAAAA
- });
- var plane = new THREE.Mesh(planeGeometry, planeMaterial);
- // rotate and position the plane
- plane.rotation.x = -0.5 * Math.PI;
- plane.position.set(15, 0, 0);
- plane.receiveShadow = true;
- // add the object
- scene.add(cube);
- scene.add(sphere);
- scene.add(plane);
- // position and point the camera to the center of the scene
- camera.position.x = -30;
- camera.position.y = 40;
- camera.position.z = 30;
- camera.lookAt(scene.position);
- // add spotlight for the shadows
- var spotLight = new THREE.SpotLight(0xFFFFFF);
- spotLight.position.set(-40, 40, -15);
- spotLight.castShadow = true;
- spotLight.shadow.mapSize = new THREE.Vector2(1024, 1024);
- spotLight.shadow.camera.far = 130;
- spotLight.shadow.camera.near = 40;
- scene.add(spotLight);
- // add the output of the renderer to the html element
- document.getElementById("webgl-output").appendChild(renderer.domElement);
- // call the render function
- renderer.render(scene, camera);
- }
代码第 63 行,spotLight.castShadow 表示点光源是否产生阴影(不是所有光线都会产生阴影)。物体上也需要指定此物体是否是阴影的产生者,如第 20 行,可以通过 cube.castShadow 开启。除此之外,还需要定义阴影的接收者,此处是平面,如代码 47 行所示,可以通过 plane.receiveShadow 设置。
spotLight.shadow.camera.far 表示从光源位置开始,在光线照射下阴影范围的最远距离。如果一个物体在这个距离之外,则不会产生阴影。
spotLight.shadow.camera.near 表示从光源位置开始,在光线照射下阴影范围的最近距离。如果一个物体在这个距离之内,则不会产生阴影。
这边看着比较麻烦,又要指定阴影的产生者,又要指定接收者。
其实是因为阴影的模拟计算比较耗时,这样逐个指定更具选择性,对不必要的物体可以不进行渲染。
在 Three.js 中,使用深度贴图绘制阴影。如代码第 64 行,spotLight.shadow.mapSize 指定贴图的大小,大小越大,阴影精度越高。同时不要忘记渲染器使能深度贴图绘制,如代码第 12 行所示,通过 renderer.shadowMap.enabled 开启。
图 3 是运行结果,可以看到物体上有了明暗的渐变,同时也产生了阴影。
4. 让你的场景动起来
让场景动起来的方式,就是更新每帧渲染的内容。这边我们使用浏览器提供的 requestAnimationFrame API 来进行每帧的更新。
requestAnimationFrame 和 setInterval 类似,都是提供定时回调功能。
不过 requestAnimationFrame 的执行频率通常与浏览器的屏幕刷新频率相同。依托于浏览器本身的刷新策略,不会浪费系统资源,画面也更加流畅。
4.1 引入 requestAnimationFrame() 方法
我们先做好帧更新的框架,并先引入性能监测。如代码清单 4.1 所示,我们通过引入 Stats.js 库还实现性能监测、
- @{
- ViewData["Title"] = "Example 01.04 - Materials, light and animation";
- }
- <script type="text/javascript" charset="utf-8" src="~/lib/three/three.js"></script>
- <script type="text/javascript" charset="utf-8" src="~/lib/three/controls/TrackballControls.js"></script>
- <script type="text/javascript" charset="utf-8" src="~/lib/util/Stats.js"></script>
- <script type="text/javascript" charset="utf-8" src="~/js/util.js"></script>
- <script type="text/javascript" charset="utf-8" src="~/src/chapter-01/js/01-04.js"></script>
- <!-- Div which will hold the Output -->
- <div id="webgl-output"></div>
- <script type="text/javascript">
- (function () {
- // contains the code for the example
- init();
- })();
- </script>
代码清单 4.2 是帧更新的基本框架。我们主要看到第 82 至 88 行的 renderScene() 函数,其中对性能监测状态进行更新,并重新将 renderScene() 通过 requestAnimationFrame 注册为回调函数。需要注意,场景渲染 renderer.render 也移到了帧更新的函数中。
- function init() {
- var stats = initStats();
- // default setup
- var scene = new THREE.Scene();
- var camera = new THREE.PerspectiveCamera(45, window.innerWidth / window.innerHeight, 0.1, 1000);
- var renderer = new THREE.WebGLRenderer();
- renderer.setClearColor(new THREE.Color(0x000000));
- renderer.setSize(window.innerWidth, window.innerHeight);
- renderer.shadowMap.enabled = true;
- // show axes in the screen
- var axes = new THREE.AxesHelper(20);
- scene.add(axes);
- // create the ground plane
- var planeGeometry = new THREE.PlaneGeometry(60, 20, 1, 1);
- var planeMaterial = new THREE.MeshLambertMaterial({ color: 0xffffff });
- var plane = new THREE.Mesh(planeGeometry, planeMaterial);
- plane.receiveShadow = true;
- // rotate and position the plane
- plane.rotation.x = -0.5 * Math.PI;
- plane.position.x = 15;
- plane.position.y = 0;
- plane.position.z = 0;
- // add the plane to the scene
- scene.add(plane);
- // create a cube
- var cubeGeometry = new THREE.BoxGeometry(4, 4, 4);
- var cubeMaterial = new THREE.MeshLambertMaterial({ color: 0xff0000 });
- var cube = new THREE.Mesh(cubeGeometry, cubeMaterial);
- cube.castShadow = true;
- // position the cube
- cube.position.x = -4;
- cube.position.y = 4;
- cube.position.z = 0;
- // add the cube to the scene
- scene.add(cube);
- var sphereGeometry = new THREE.SphereGeometry(4, 20, 20);
- var sphereMaterial = new THREE.MeshLambertMaterial({ color: 0x7777ff });
- var sphere = new THREE.Mesh(sphereGeometry, sphereMaterial);
- // position the sphere
- sphere.position.x = 20;
- sphere.position.y = 0;
- sphere.position.z = 2;
- sphere.castShadow = true;
- // add the sphere to the scene
- scene.add(sphere);
- // position and point the camera to the center of the scene
- camera.position.x = -30;
- camera.position.y = 40;
- camera.position.z = 30;
- camera.lookAt(scene.position);
- // add subtle ambient light
- var ambientLight = new THREE.AmbientLight(0x353535);
- scene.add(ambientLight);
- // add spotlight for the shadows
- var spotLight = new THREE.SpotLight(0xffffff);
- spotLight.position.set(-10, 20, -5);
- spotLight.castShadow = true;
- scene.add(spotLight);
- // add the output of the renderer to the html element
- document.getElementById("webgl-output").appendChild(renderer.domElement);
- // call the render function
- var step = 0;
- renderScene();
- function renderScene() {
- stats.update();
- // render using requestAnimationFrame
- requestAnimationFrame(renderScene);
- renderer.render(scene, camera);
- }
- }
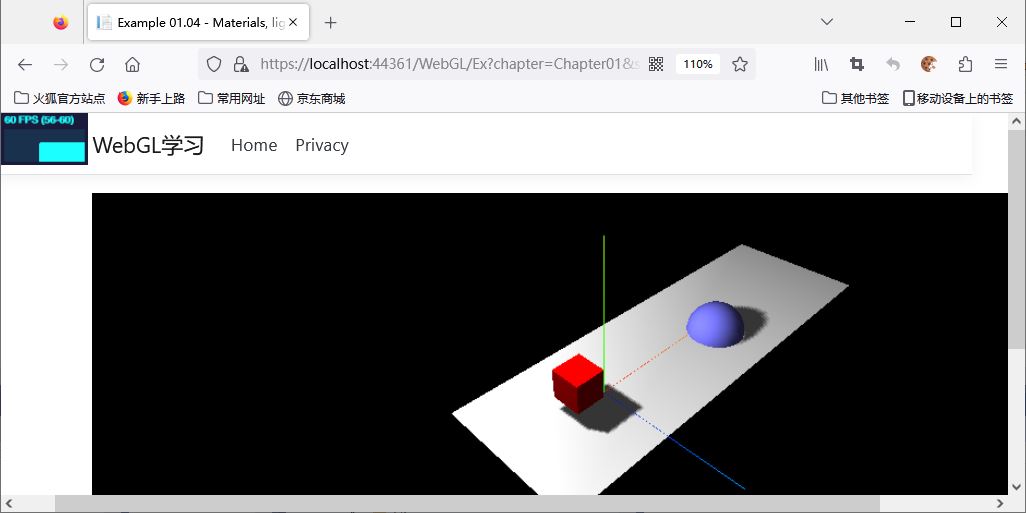
这边使用了一个新的光源 THREE.AmbientLight 环境光。环境光不会产生阴影效果。
运行结果如图 4 所示,可以看到左上角显示了帧率情况。同时因为添加了环境光,场景看着比之前的例子更亮了一点。
4.2 旋转立方体和弹跳球
现在我们在 4.1 的基础上加上物体的动画,让立方体进行旋转、让球进行弹跳。
如代码清单 4.3 所示,我们只需要在 renderScene() 增加对立方体角度的设置以及球的位置设置即可。
- function renderScene() {
- stats.update();
- // rotate the cube around its axes
- cube.rotation.x += 0.02;
- cube.rotation.y += 0.02;
- cube.rotation.z += 0.02;
- // bounce the sphere up and down
- step += 0.04;
- sphere.position.x = 20 + (10 * (Math.cos(step)));
- sphere.position.y = 2 + (10 * Math.abs(Math.sin(step)));
- // render using requestAnimationFrame
- requestAnimationFrame(renderScene);
- renderer.render(scene, camera);
- }
sphere.position.x = 20 + (10 * (Math.cos(step)));
振幅 10,范围 10 ~ 30。
sphere.position.y = 2 + (10 * Math.abs(Math.sin(step)));
振幅 10,范围 2 ~ 12。
最终的运行效果如视频 1 所示。
5. 使用 dat.GUI 简化试验流程
dat.GUI 是一个用于创建简单图形用户界面(GUI)的JavaScript库。它可以用于创建交互式控件,例如滑块、按钮、选择器等,用于在运行时调整程序的参数和行为。
引入 dat.GUI 库的方式和 4.1 中引入性能监测库一样:
- <script type="text/javascript" charset="utf-8" src="~/lib/util/dat.gui.js"></script>
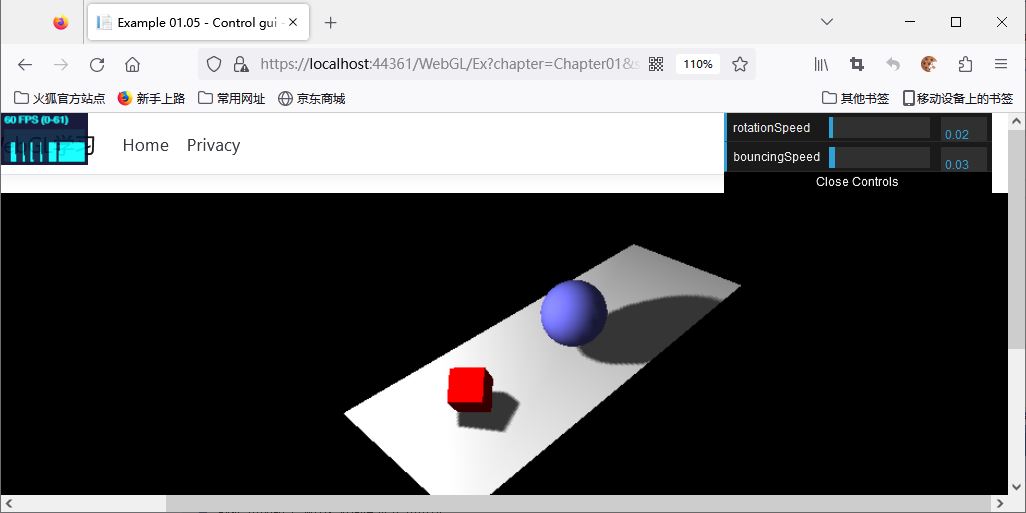
代码清单 01-05.js 是具体的实现代码,我们直接从第 81 行看起。第 81 至 84 行,创建了一个名为 controls 的对象,它包含了两个属性 rotationSpeed 和 bouncingSpeed,分别表示立方体的旋转速度和球的弹跳速度。
第 86 行创建了一个dat.GUI对象,用于显示用户界面。第 87 和第 88 行通过调用 add 方法,将 controls 对象中的 rotationSpeed 和 bouncingSpeed 属性添加到用户界面中,以便用户可以通过界面来调整它们的值。
- function init() {
- var stats = initStats();
- // create a scene, that will hold all our elements such as objects, cameras and lights.
- var scene = new THREE.Scene();
- // create a camera, which defines where we're looking at.
- var camera = new THREE.PerspectiveCamera(45, window.innerWidth / window.innerHeight, 0.1, 1000);
- // create a render and set the size
- var renderer = new THREE.WebGLRenderer();
- renderer.setClearColor(new THREE.Color(0x000000));
- renderer.setSize(window.innerWidth, window.innerHeight);
- renderer.shadowMap.enabled = true;
- // create the ground plane
- var planeGeometry = new THREE.PlaneGeometry(60, 20, 1, 1);
- var planeMaterial = new THREE.MeshLambertMaterial({ color: 0xffffff });
- var plane = new THREE.Mesh(planeGeometry, planeMaterial);
- plane.receiveShadow = true;
- // rotate and position the plane
- plane.rotation.x = -0.5 * Math.PI;
- plane.position.x = 15;
- plane.position.y = 0;
- plane.position.z = 0;
- // add the plane to the scene
- scene.add(plane);
- // create a cube
- var cubeGeometry = new THREE.BoxGeometry(4, 4, 4);
- var cubeMaterial = new THREE.MeshLambertMaterial({ color: 0xff0000 });
- var cube = new THREE.Mesh(cubeGeometry, cubeMaterial);
- cube.castShadow = true;
- // position the cube
- cube.position.x = -4;
- cube.position.y = 3;
- cube.position.z = 0;
- // add the cube to the scene
- scene.add(cube);
- var sphereGeometry = new THREE.SphereGeometry(4, 20, 20);
- var sphereMaterial = new THREE.MeshLambertMaterial({ color: 0x7777ff });
- var sphere = new THREE.Mesh(sphereGeometry, sphereMaterial);
- // position the sphere
- sphere.position.x = 20;
- sphere.position.y = 0;
- sphere.position.z = 2;
- sphere.castShadow = true;
- // add the sphere to the scene
- scene.add(sphere);
- // position and point the camera to the center of the scene
- camera.position.x = -30;
- camera.position.y = 40;
- camera.position.z = 30;
- camera.lookAt(scene.position);
- // add subtle ambient lighting
- var ambienLight = new THREE.AmbientLight(0x353535);
- scene.add(ambienLight);
- // add spotlight for the shadows
- var spotLight = new THREE.SpotLight(0xffffff);
- spotLight.position.set(-10, 20, -5);
- spotLight.castShadow = true;
- scene.add(spotLight);
- // add the output of the renderer to the html element
- document.getElementById("webgl-output").appendChild(renderer.domElement);
- // call the render function
- var step = 0;
- var controls = new function () {
- this.rotationSpeed = 0.02;
- this.bouncingSpeed = 0.03;
- }
- var gui = new dat.GUI();
- gui.add(controls, "rotationSpeed", 0, 0.5);
- gui.add(controls, "bouncingSpeed", 0, 0.5);
- // attach them here, since appendChild needs to be called first
- var trackballControls = initTrackballControls(camera, renderer);
- var clock = new THREE.Clock();
- render();
- function render() {
- // update the stats and the controls
- trackballControls.update(clock.getDelta());
- stats.update();
- // rotate the cube around its axes
- cube.rotation.x += controls.rotationSpeed;
- cube.rotation.y += controls.rotationSpeed;
- cube.rotation.z += controls.rotationSpeed;
- // bounce the sphere up and down
- step += controls.bouncingSpeed;
- sphere.position.x = 20 + (10 * (Math.cos(step)));
- sphere.position.y = 2 + (10 * Math.abs(Math.sin(step)));
- // render using requestAnimationFrame
- requestAnimationFrame(render);
- renderer.render(scene, camera);
- }
- }
运行结果如图 5 所示,我们可以看到右上角的两个滑块,可以通过滑动它们调节旋转速度以及弹跳速度。
我们继续看到代码清单 5 的第 91 行。我们一早就引入了 TrackballControls 的库,但是没有初始化,此处就对其进行了初始化。需要注意的是,要在把渲染的 dom appendChild 到浏览器 dom 中,才能初始化 TrackballControls。初始化完之后,我们就可以按住鼠标左键来转动摄像机。
TrackballControls 库可以鼠标控制相机位置,所以必须在渲染的 dom 添加到了浏览器 dom 之后,才能绑定鼠标等事件。
6. 场景对浏览器的自适应
目前我们的渲染区域还不能自适应屏幕,渲染区域在初始化的时候就固定了。
为了实现渲染区域自适应屏幕,如代码清单 5 第 3 行所示,我们绑定 resize 事件监听。当窗口的大小发生改变时,会触发 resize 事件,然后执行我们绑定的 onResize 函数。
onResize() 函数在第 125 至 129 行,其中改变了相机的 aspect 宽高比参数,并更新了投影矩阵。最后设置了渲染器新的渲染尺寸。
相机的投影矩阵和 fov、aspect、far、near 相关,而窗口大小的改变只影响到 aspect 参数。
- function init() {
- // listen to the resize events
- window.addEventListener('resize', onResize, false);
- var camera;
- var scene;
- var renderer;
- // initialize stats
- var stats = initStats();
- // create a scene, that will hold all our elements such as objects, cameras and lights.
- scene = new THREE.Scene();
- // create a camera, which defines where we're looking at.
- camera = new THREE.PerspectiveCamera(45, window.innerWidth / window.innerHeight, 0.1, 1000);
- // create a render and set the size
- renderer = new THREE.WebGLRenderer();
- renderer.setClearColor(new THREE.Color(0x000000));
- renderer.setSize(window.innerWidth, window.innerHeight);
- renderer.shadowMap.enabled = true;
- // create the ground plane
- var planeGeometry = new THREE.PlaneGeometry(60, 20, 1, 1);
- var planeMaterial = new THREE.MeshLambertMaterial({ color: 0xffffff });
- var plane = new THREE.Mesh(planeGeometry, planeMaterial);
- plane.receiveShadow = true;
- // rotate and position the plane
- plane.rotation.x = -0.5 * Math.PI;
- plane.position.x = 15;
- plane.position.y = 0;
- plane.position.z = 0;
- // add the plane to the scene
- scene.add(plane);
- // create a cube
- var cubeGeometry = new THREE.BoxGeometry(4, 4, 4);
- var cubeMaterial = new THREE.MeshLambertMaterial({ color: 0xff0000 });
- var cube = new THREE.Mesh(cubeGeometry, cubeMaterial);
- cube.castShadow = true;
- // position the cube
- cube.position.x = -4;
- cube.position.y = 3;
- cube.position.z = 0;
- // add the cube to the scene
- scene.add(cube);
- var sphereGeometry = new THREE.SphereGeometry(4, 20, 20);
- var sphereMaterial = new THREE.MeshLambertMaterial({ color: 0x7777ff });
- var sphere = new THREE.Mesh(sphereGeometry, sphereMaterial);
- // position the sphere
- sphere.position.x = 20;
- sphere.position.y = 0;
- sphere.position.z = 2;
- sphere.castShadow = true;
- // add the sphere to the scene
- scene.add(sphere);
- // position and point the camera to the center of the scene
- camera.position.x = -30;
- camera.position.y = 40;
- camera.position.z = 30;
- camera.lookAt(scene.position);
- // add subtle ambient lighting
- var ambienLight = new THREE.AmbientLight(0x353535);
- scene.add(ambienLight);
- // add spotlight for the shadows
- var spotLight = new THREE.SpotLight(0xffffff);
- spotLight.position.set(-10, 20, -5);
- spotLight.castShadow = true;
- scene.add(spotLight);
- // add the output of the renderer to the html element
- document.getElementById("webgl-output").appendChild(renderer.domElement);
- // initialize the trackball controls and the clock which is needed
- var trackballControls = initTrackballControls(camera, renderer);
- var clock = new THREE.Clock();
- // call the render function
- var step = 0;
- var controls = new function () {
- this.rotationSpeed = 0.02;
- this.bouncingSpeed = 0.03;
- };
- var gui = new dat.GUI();
- gui.add(controls, 'rotationSpeed', 0, 0.5);
- gui.add(controls, 'bouncingSpeed', 0, 0.5);
- render();
- function render() {
- // update the stats and the controls
- trackballControls.update(clock.getDelta());
- stats.update();
- // rotate the cube around its axes
- cube.rotation.x += controls.rotationSpeed;
- cube.rotation.y += controls.rotationSpeed;
- cube.rotation.z += controls.rotationSpeed;
- // bounce the sphere up and down
- step += controls.bouncingSpeed;
- sphere.position.x = 20 + (10 * (Math.cos(step)));
- sphere.position.y = 2 + (10 * Math.abs(Math.sin(step)));
- // render using requestAnimationFrame
- requestAnimationFrame(render);
- renderer.render(scene, camera);
- }
- function onResize() {
- camera.aspect = window.innerWidth / window.innerHeight;
- camera.updateProjectionMatrix();
- renderer.setSize(window.innerWidth, window.innerHeight);
- }
- }
最后这个样例就不贴图了,因为样例本身就是能在 Web 上运行的。以下就是整体代码在浏览器上运行的效果。