
进程管理
实验:fork 和 clone 系统调用
1. 使用 fork() 函数创建一个子进程,然后在父进程和子进程中分别使用 printf 语句来判断谁是父进程和子进程
fork() 函数的定义:用于创建一个新的进程,这个新的进程被称为子进程,它是当前进程的复制品。子进程和父进程拥有不同的进程 ID,fork() 函数在父进程中返回新创建的子进程的 ID,在子进程中返回0。
定义我们已经知道,先上程序。如代码清单 1 所示,通过 fork() 的返回值判断是父进程还是子进程。并用 getpid() 函数获取进程 ID,来进行验证。
- #include <stdio.h>
- #include <sys/types.h>
- #include <unistd.h>
- int main()
- {
- // 创建子进程
- pid_t pid = fork();
- // 判断创建过程是否出错
- if (pid < 0) {
- printf("Fork failed!\n");
- return 1;
- }
- // 如果返回值为0,说明是子进程
- if (pid == 0) {
- printf("I am the child process, my process id is %d\n", getpid());
- } else {
- // 如果返回值大于0,说明是父进程
- printf("I am the parent process, my process id is %d, and the id of my child process is %d\n", getpid(), pid);
- }
- return 0;
- }
程序运行结果如下:
- I am the parent process, my process id is 33214, and the id of my child process is 33215
- I am the child process, my process id is 33215
现在的问题就是了解 fork 为什么子进程和父进程会返回不同的值。
我第一次了解也好奇到底怎么做到的,非常“神奇”。
我们先简单了解进程的概念。在 linux 操作系统中,进程是程序的执行实例,它是资源分配和调度的基本单位。而 task_struct 是内核中的一个数据结构,用于描述一个进程。它里面包含了关于进程的所有信息,比如状态信息、调度信息、进程关系和内存区域等等。
图 1 中展示了 fork 的基本流程,对应内核中的 _do_fork 函数。
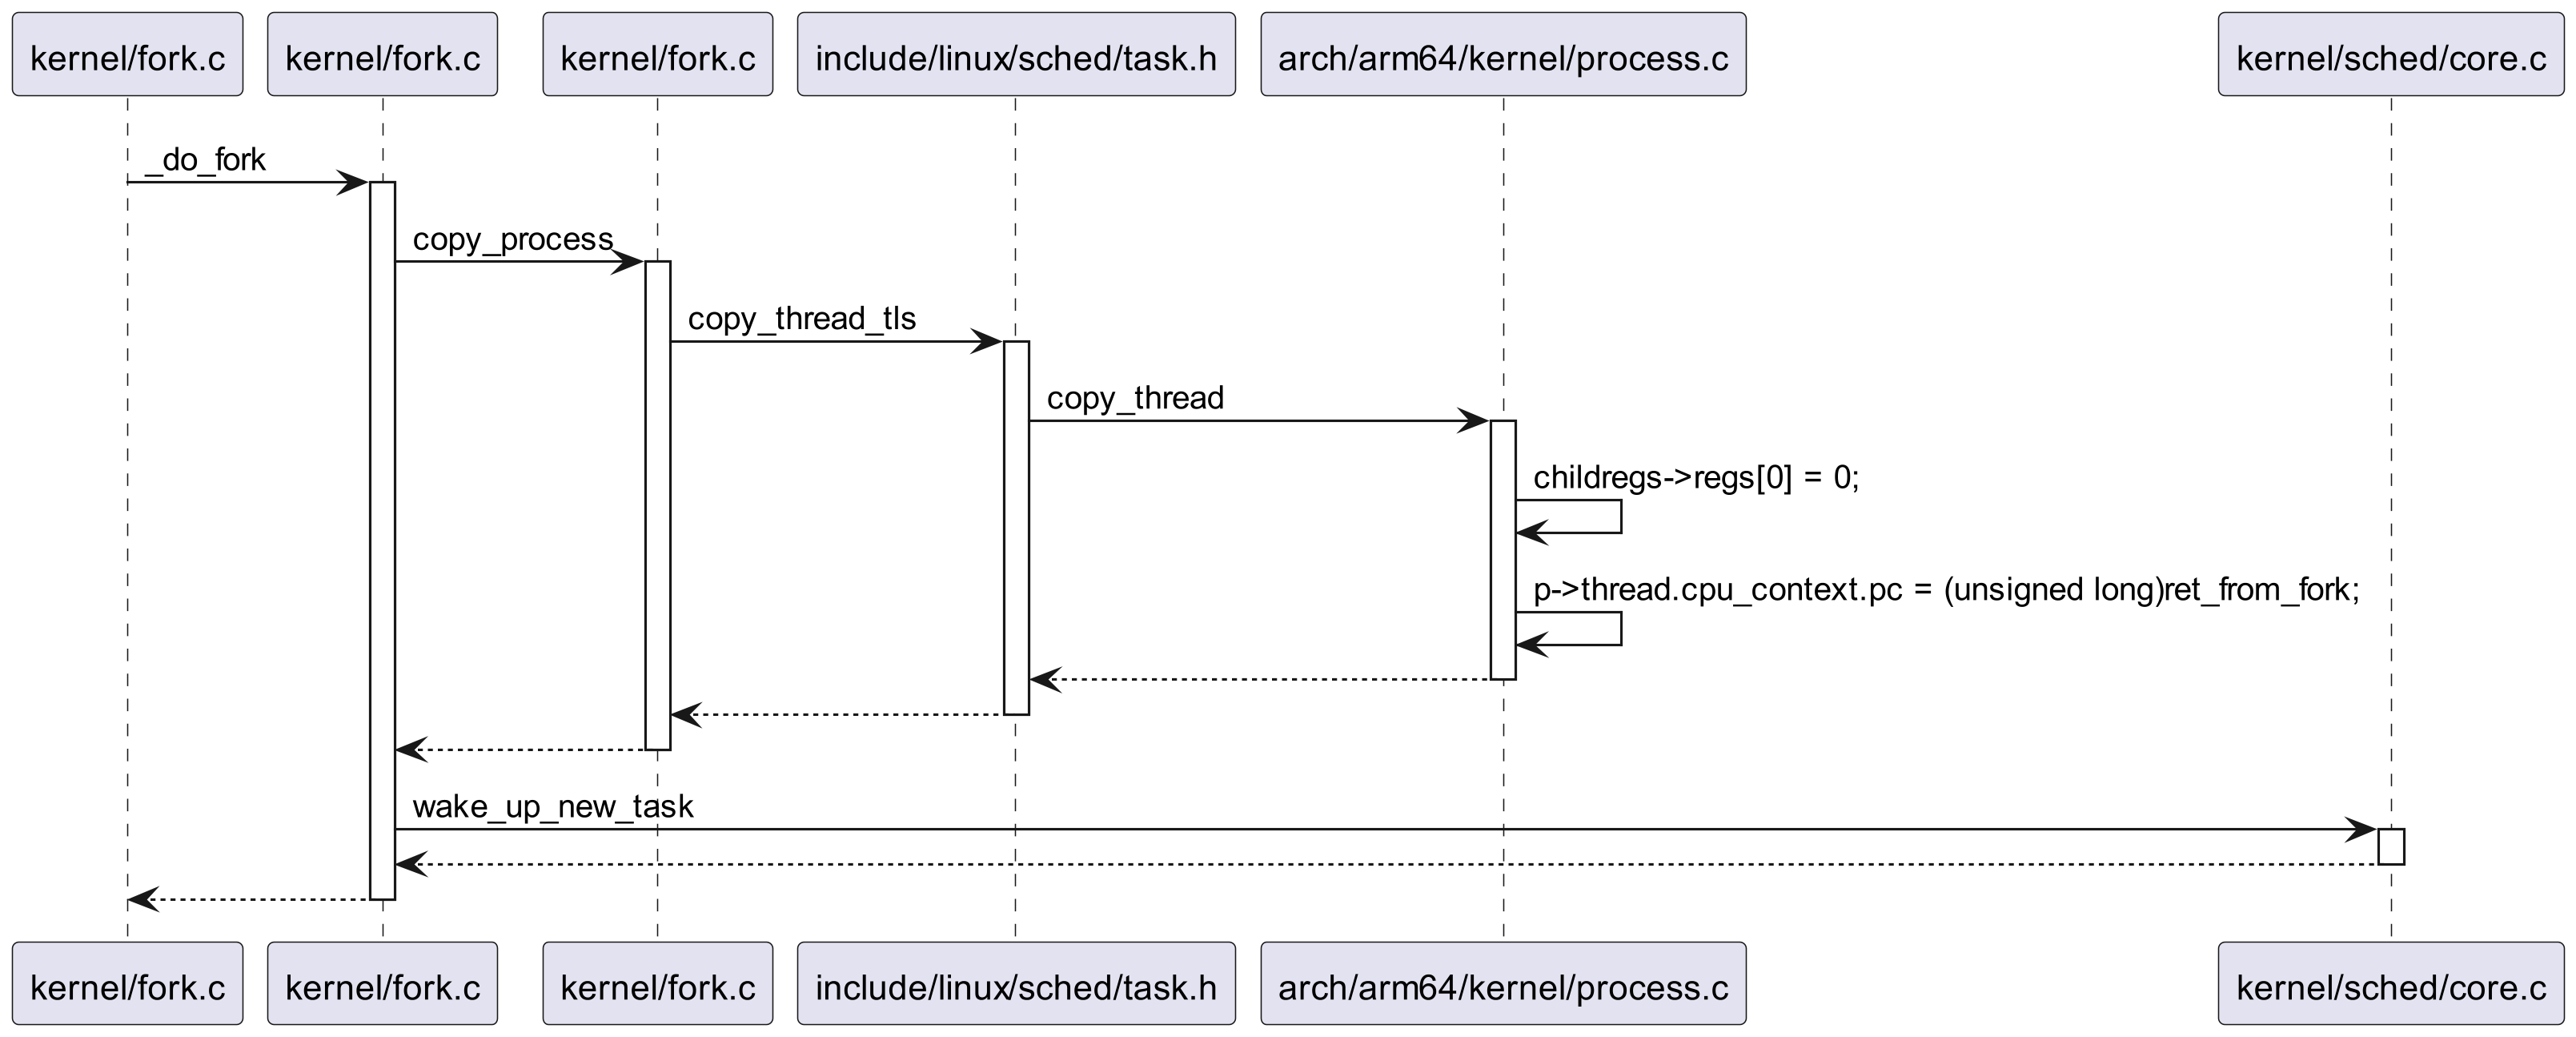
看到 _do_fork 中的 copy_process 函数,它的作用是基于当前进程的上下文,复制创建一个子进程。因为是复制自身上下文,所以创建的子进程和父进程几乎是相同的。
因为是复制操作,copy_process 中有大量 cpoy 打头的函数。比如 copy_mm 复制内存,copy_files 复制文件描述符,copy_fs 复制文件系统,等等。
我们这边先只关注 copy_thread_tls 函数,它的作用是复制进程的上下文,这边的上下文可以简单理解成寄存器状态。
copy_thread_tls 跟踪进去,我们可以看到
- childregs->regs[0] = 0;
即设置子进程待恢复的 X0 寄存器为 0。X0 寄存器是存储函数返回值的,这就是 fork 子进程返回 0 的原因。
再看到这句
- p->thread.cpu_context.pc = (unsigned long)ret_from_fork;
它设置子进程的程序计数器寄存器,即子进程恢复时会执行到 ret_from_fork。这就和原本父进程的 return 区分开了。至此,就是 fork 函数父进程和子进程会返回不同值的关键。
copy_process 返回子进程的 task_struct 结构体。我们可以简单理解子进程这时候已经创建好了。
创建好子进程之后,会调用 wake_up_new_task 函数,将子进程添加到调度队列上,等待调度。最后,会返回子进程的 PID,即父进程返回子进程的 PID。子进程被调度到后,恢复上下文,就会如上述所讲,从 ret_from_fork 处继续直接,并返回 0(X0 寄存器)。
2. 使用 clone() 函数创建一个子进程。如果父进程和子进程共同访问一个全局变量,结果会如何?如果父进程比子进程先消亡,结果会如何?
clone() 也是 linux 提供的一个系统调用,它用于创建进程,粒度更细。fork() 在内部实现上也是基于 clone() 的。其定义为:
- int clone(int (*fn)(void*), void* child_stack, int flags, void* arg);
其中,fn 是一个函数指针,指向子进程/线程首先执行的函数;child_stack 指向为子进程分配的堆栈的开始位置;flags 是一个标志集,指定哪些资源应该共享;arg 是传递给 fn 函数的参数。
如代码 2 所示,我们直接看代码进行验证。
- #define _GNU_SOURCE
- #include <sched.h>
- #include <signal.h>
- #include <stdio.h>
- #include <stdlib.h>
- #include <unistd.h>
- #include <malloc.h>
- #include <sys/types.h>
- #include <sys/wait.h>
- int param = 0;
- int thread_fn(void* data)
- {
- int j;
- printf("start child thread_fn: pid=%d, parent pid=%d\n", getpid(), getppid());
- for (j = 0; j < 10; j++)
- {
- param++;
- sleep(1);
- printf("child thread running: j=%d, param=%d\n", j, param);
- }
- printf("child thread_fn exit: parent pid=%d\n", getppid());
- return 0;
- }
- int main()
- {
- int j, tid, pagesize, stacksize;
- void* stack;
- printf("start parent process: pid=%d\n", getpid());
- pagesize = getpagesize();
- stacksize = 4 * pagesize;
- posix_memalign(&stack, pagesize, stacksize);
- tid = clone(thread_fn, (char*)stack + stacksize, CLONE_VM | SIGCHLD, 0);
- printf("set a clone child thread with stacksize=%d tid=%d\n", stacksize, tid);
- if (tid < 0)
- exit(EXIT_FAILURE);
- for (j = 0; j < 6; j++)
- {
- param++;
- sleep(1);
- printf("parent thread running: j=%d, param=%d\n", j, param);
- }
- printf("parent killitself\n");
- /* We shouldn't free(stack) here since the child using it is still running */
- exit(EXIT_SUCCESS);
- }
代码中首先用 clone() 函数创建了一个子进程,通过 CLONE_VM 指定父进程和子进程共享相同的内存空间。这意味着子进程和父进程共享此程序里的全局变量 param。
SIGCHLD 参数指明,当子进程停止或退出时,它的父进程会收到一个 SIGCHLD 信号。
我们通过打印来看最初的问题:
- start parent process: pid=410713
- set a clone child thread with stacksize=16384 tid=410714
- start child thread_fn: pid=410714, parent pid=410713
- parent thread running: j=0, param=2
- child thread running: j=0, param=3
- parent thread running: j=1, param=4
- child thread running: j=1, param=5
- parent thread running: j=2, param=6
- child thread running: j=2, param=7
- parent thread running: j=3, param=8
- child thread running: j=3, param=9
- parent thread running: j=4, param=10
- child thread running: j=4, param=11
- parent thread running: j=5, param=12
- parent killitself
- child thread running: j=5, param=12
- child thread running: j=6, param=13
- child thread running: j=7, param=14
- child thread running: j=8, param=15
- child thread running: j=9, param=16
- child thread_fn exit: parent pid=1
如果父进程和子进程共同访问一个全局变量,结果会如何?这就是多线程会遇到的问题,需要考虑变量的同步。
如果父进程比子进程先消亡,结果会如何?在样例中可以看到,当父进程比子进程先退出后,init 进程(pid=1)会接管子进程,负责后续的资源回收工作。
这边还遗留一个问题:父进程在退出前不能释放分配给子进程的栈内存,因为子进程没有退出还需要用到。但是操作系统是怎么管理这段内存的回收的?
这边猜测是子进程和父进程共用内存的原因,问题留作后续关注。
3. 打印几个“_”
- int main()
- {
- int i;
- for (i = 0; i < 2; i++)
- {
- fork();
- printf("_\n");
- }
- return 0;
- }
代码清单 3 是题目,问运行程序会打印几个“_”?从上述题目我们已经了解到,通过 fork() 生成的子进程可以看成调用那时父进程的复制。以此我们进行手动分析,如图 2 所示,我们追踪各个进程 i 变量的值,可以得到总共会打印 6 次。
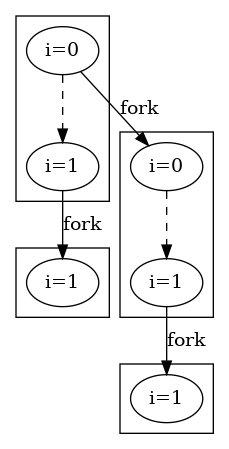
当然,执行程序验证同样是打印了 6 次,符合预期。
实验:内核线程
这一节学习内核线程的使用。我们创建一组内核线程,并在各个 CPU 上执行。
我们直接看到代码。如清单 4 所示,我们在模块加载时,遍历每个活跃的 CPU。针对每个 CPU,我们使用 kthread_create 创建一个内核线程,并使用 kthread_bind 与其绑定,最后调用 wake_up_process 把线程加入调度队列,等待执行。
- #include <linux/module.h>
- #include <linux/init.h>
- #include <linux/kthread.h>
- #include <linux/delay.h>
- static struct task_struct* tsk[NR_CPUS];
- static void print_cpu(char* s)
- {
- preempt_disable();
- pr_info("%s cpu=%d\n", s, smp_processor_id());
- preempt_enable();
- }
- static void show_reg(void)
- {
- unsigned int spsr, sp, el;
- asm("mrs %0, spsr_el1" : "=r" (spsr) : : "cc");
- asm("mov %0, sp" : "=r" (sp) : : "cc");
- asm("mrs %0, CurrentEL" : "=r" (el) : : "cc");
- printk("spsr:0x%x, sp:0x%x, el=%d\n", spsr, sp, el >> 2);
- }
- static void show_prio(void)
- {
- struct task_struct* task = current;
- printk("%s pid:%d, nice:%d, prio:%d, static_prio:%d, normal_prio:%d\n",
- task->comm, task->pid,
- PRIO_TO_NICE(task->static_prio),
- task->prio, task->static_prio,
- task->normal_prio);
- }
- static int thread_fn(void* t)
- {
- do
- {
- print_cpu("Sleep in thread function");
- msleep_interruptible(2000);
- print_cpu("msleep over in thread function");
- print_cpu("Running");
- show_reg();
- show_prio();
- } while (!kthread_should_stop());
- return 0;
- }
- static int __init my_init(void)
- {
- int i;
- print_cpu("Loading module");
- for_each_online_cpu(i)
- {
- tsk[i] = kthread_create(thread_fn, NULL, "kdemo/%d", i);
- if (!tsk[i])
- {
- pr_info("Fail to generate a kernel thread\n");
- return -1;
- }
- kthread_bind(tsk[i], i);
- pr_info("About to wake up and run the thread for cpu=%d\n", i);
- wake_up_process(tsk[i]);
- pr_info("Start thread for cpu %d", i);
- print_cpu("on");
- }
- return 0;
- }
- static void __exit my_exit(void)
- {
- int i;
- for_each_online_cpu(i)
- {
- pr_info("Kill thread %d", i);
- kthread_stop(tsk[i]);
- print_cpu("Kill was done on");
- }
- }
- module_init(my_init);
- module_exit(my_exit);
- MODULE_AUTHOR("rlk");
- MODULE_LICENSE("GPL v2");
kthread_create 函数用于创建内核线程。它的定义如下:
- struct task_struct* kthread_create(int (*threadfn)(void* data),
- void* data,
- const char namefmt[], ...);
其中,threadfn 是当线程启动时,将要执行的函数;data 是传递给函数的参数;namefmt 是一个格式化字符串,用于给创建的内核线程命名。
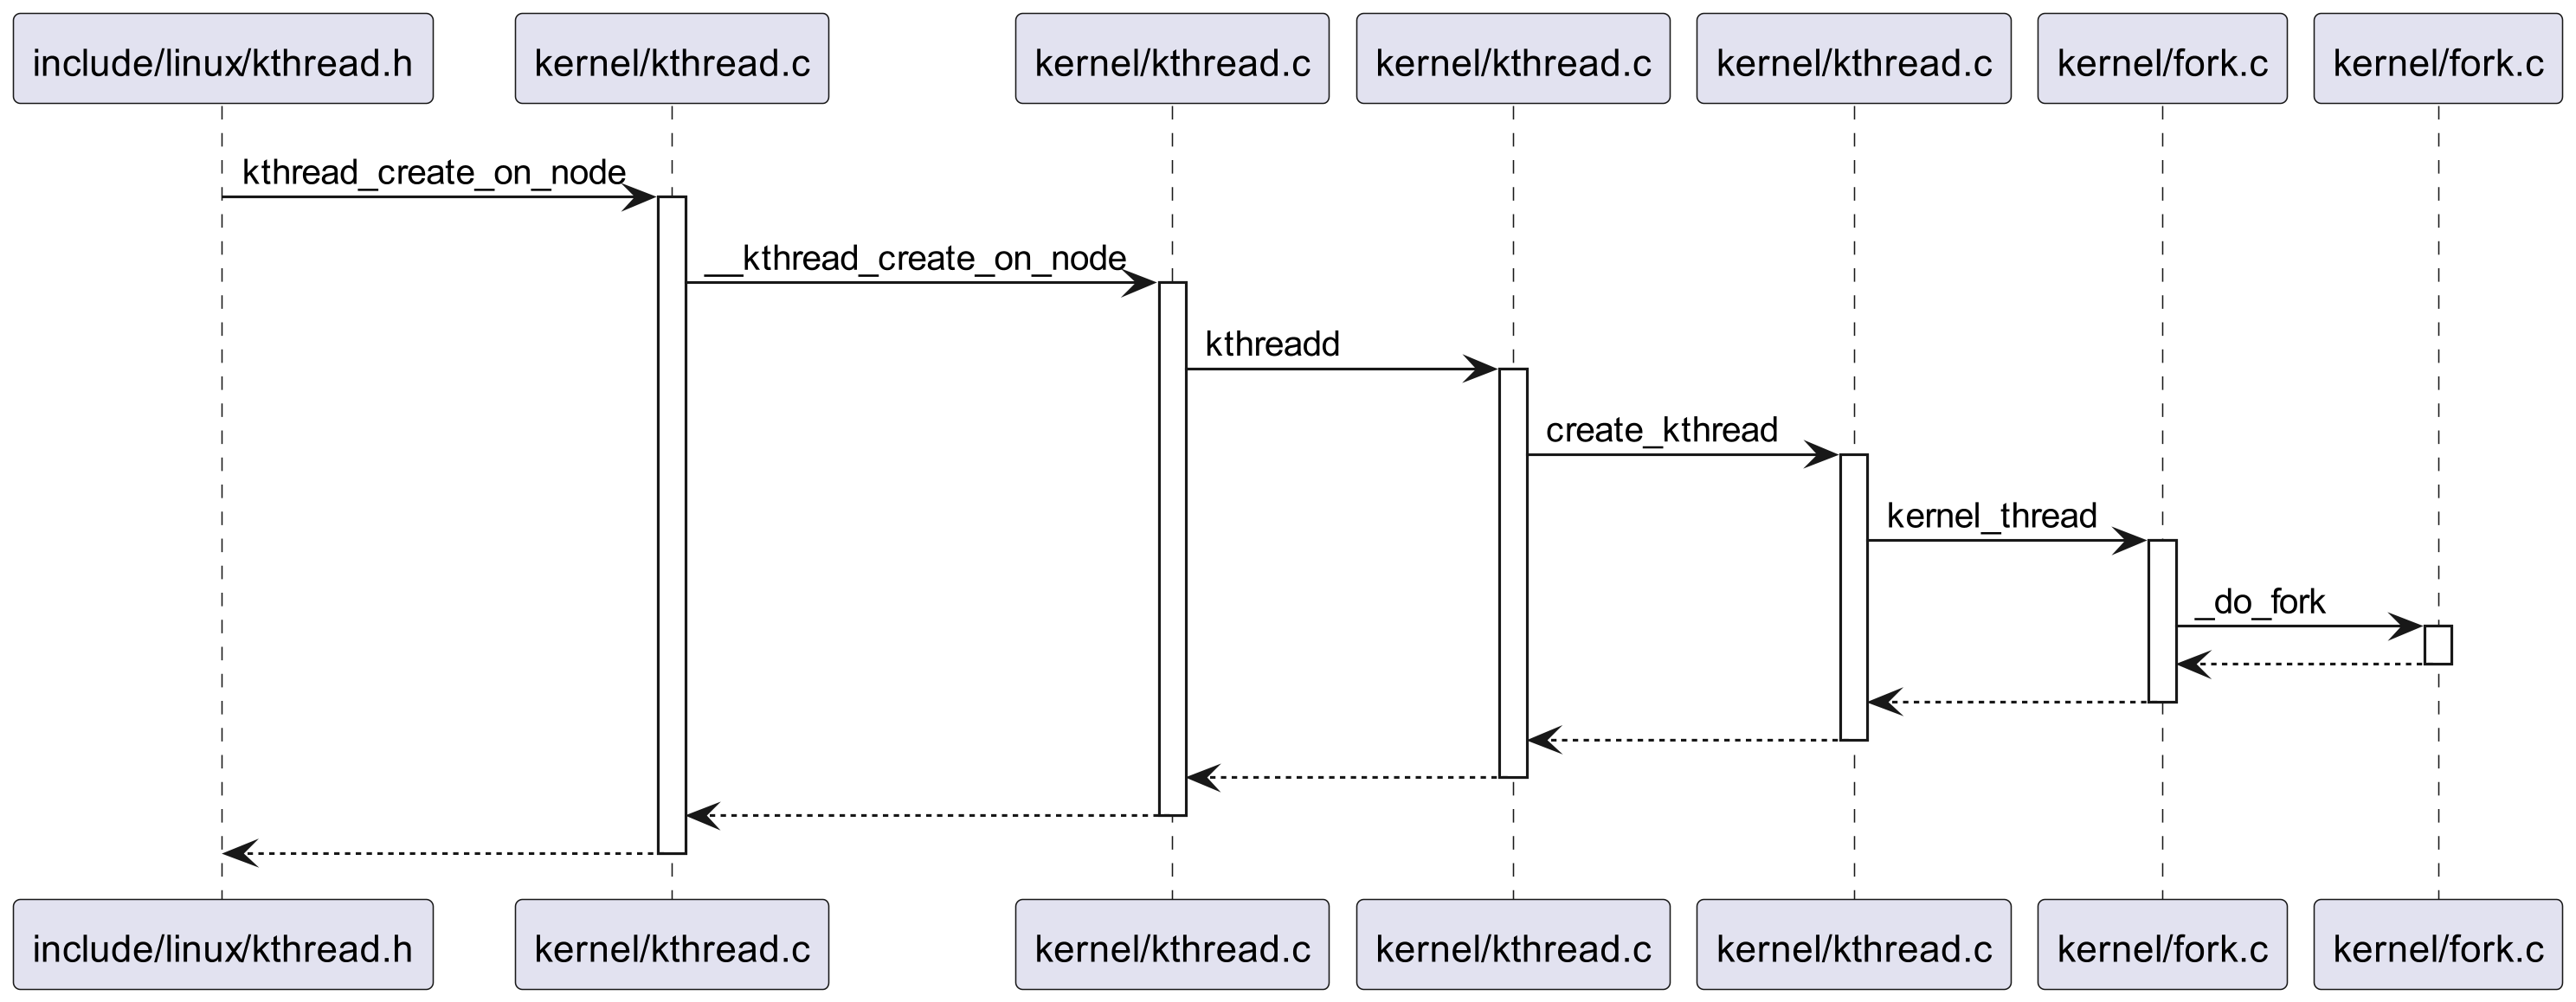
图 3 是 kthread_create 的基本调用流程,可以看到兜兜转转又调用到我们之前了解过的 _do_fork 函数。
kthread_bind 函数用于将一个新创建的内核线程绑定到一个特定的 CPU 上。它的定义为:
- void kthread_bind(struct task_struct* p, unsigned int cpu);
kthread_bind 猜测是做了什么标记,当线程被调度的时候,只会在标记指定了的 CPU 上运行。而原先是会根据负载均衡自行决定在那个 CPU 上执行。这块内容留作后续深究。
最后我们看到内核线程执行的函数 thread_fn,其中打印了 CPU 信息、任务信息和当前的寄存器值。注意,因为此处例子中寄存器是 ARM 相关的,所以这个模块只能在 qemu 上运行了。
实验:后台守护进程
这一节学习如何创建守护进程。我们直接看到实现,如代码清单 5 所示,它创建守护进程间隔读取内核日志,如果日志中检查到特定字符串,则把整个内核日志保存到文件中。
- #include <stdio.h>
- #include <unistd.h>
- #include <stdlib.h>
- #include <time.h>
- #include <fcntl.h>
- #include <string.h>
- #include <sys/stat.h>
- #include <sys/klog.h>
- #define FALLBACK_KLOG_BUF_SHIFT 17 /* CONFIG_LOG_BUF_SHIFT in kernel */
- #define FALLBACK_KLOG_BUF_LEN (1 << FALLBACK_KLOG_BUF_SHIFT)
- #define KLOG_CLOSE 0
- #define KLOG_OPEN 1
- #define KLOG_READ 2
- #define KLOG_READ_ALL 3
- #define KLOG_READ_CLEAR 4
- #define KLOG_CLEAR 5
- #define KLOG_CONSOLE_OFF 6
- #define KLOG_CONSOLE_ON 7
- #define KLOG_CONSOLE_LEVEL 8
- #define KLOG_SIZE_UNREAD 9
- #define KLOG_SIZE_BUFFER 10
- /* we use 'Linux version' string instead of Oops in this lab */
- //#define OOPS_LOG "Oops"
- //#define OOPS_LOG "Linux version"
- #define OOPS_LOG "audit"
- int save_kernel_log(char* buffer)
- {
- char path[128];
- time_t t;
- struct tm* tm;
- int fd;
- t = time(0);
- tm = localtime(&t);
- snprintf(path, 128, "/mnt/%d.%d.%d.%d.%d.%d.log", tm->tm_year + 1900,
- tm->tm_mon + 1, tm->tm_mday, tm->tm_hour,
- tm->tm_min, tm->tm_sec);
- printf("%s\n", path);
- fd = open(path, O_WRONLY | O_CREAT, 0644);
- if (fd == -1)
- {
- printf("open error\n");
- return -1;
- }
- write(fd, buffer, strlen(buffer));
- close(fd);
- return 0;
- }
- int check_kernel_log()
- {
- char* buffer;
- char* p;
- ssize_t klog_size;
- int ret = -1;
- int size;
- printf("start kernel log\n");
- klog_size = klogctl(KLOG_SIZE_BUFFER, 0, 0);
- if (klog_size <= 0)
- {
- klog_size = FALLBACK_KLOG_BUF_LEN;
- }
- printf("kernel log size: %d\n", klog_size);
- buffer = malloc(klog_size + 1);
- if (!buffer)
- return -1;
- size = klogctl(KLOG_READ_ALL, buffer, klog_size);
- if (size < 0)
- {
- printf("klogctl read error\n");
- goto done;
- }
- buffer[size] = '\0';
- /* check if oops in klog */
- p = strstr(buffer, OOPS_LOG);
- if (p)
- {
- printf("we found '%s' on kernel log\n", OOPS_LOG);
- save_kernel_log(buffer);
- ret = 0;
- }
- done:
- free(buffer);
- return ret;
- }
- int main()
- {
- if (daemon(0, 0) == -1)
- {
- printf("daemon error\n");
- return 0;
- }
- while (1)
- {
- check_kernel_log();
- sleep(5);
- }
- return 0;
- }
daemon 函数用于将当前进程转化为一个守护进程。守护进程是一个后台进程,与控制终端分离,并在后台运行,常常用于执行各种系统管理任务,例如日志记录、任务调度等。其函数定义为:
- int daemon(int nochdir, int noclose);
daemon 的大致操作原理如下:
1. 调用 fork 创建子进程。父进程立即退出,子进程继续后续操作。
可以看到还是利用了 fork。
2. 使用 setsid 创建新的会话,让子进程成为该会话的领导。从而脱离终端控制。
脱离控制的一个原因是,有了新会话,比如原始终端被关闭,新进程也不会收到信号。
3. 改变当前工作目录。由函数参数 nochdir 指定,如果 nochdir 为 0,则将当前工作目录更改为 '/'。
4. 重定位标准输入、输出和错误。由函数参数 noclose 指定,如果 noclose 为 0,则会关闭 标准输入、输出和错误,并重定位到 /dev/null。