深度测试
深度测试是用来解决三维渲染中物体遮挡的显示问题。一般来说,近的物体会遮挡住远的物体。而默认情况下,后绘制的像素又会把之前绘制的像素覆盖掉。当然,我们可以自己处理好物体的绘制顺序,但是深度测试是一种更加简洁的处理手段。
深度测试的实现也不复杂。我们使用一个额外的缓冲区,一般称作深度缓冲区或 z 缓冲区,来存储屏幕上每个像素的深度值。当新的像素需要绘制的时候,我们会比较这个像素的深度值与缓冲区中记录的之前的深度值。以前面挡住后面为例,如果新像素的深度值小于缓冲区里的值,新像素就会绘制;反之,这个新像素就不会被绘制。
1. OpenGL 接口
我们以 OpenGL 的接口作为参照,来了解深度测试功能。
OpenGL 中使用 glEnable 传递 GL_DEPTH_TEST 开启深度测试。
glDepthFunc 用于指定深度比较的条件。比如 GL_LESS 表示新的深度值小于存储的深度值才通过测试;GL_GREATER 表示新的深度值大于存储的深度值才通过测试。
- void glDepthFunc(GLenum func);
2. 代码实现
我们用代码实现,对深度测试的细节进行具体说明。
如代码清单 1 所示,我们先仿照 OpenGL,实现自己的 glEnable 和 glDepthFunc 接口。
- void TSoftRenderer::Enable(TEnableCap cap)
- {
- if (cap == TEnableCap::CullFace)
- m_state.SetCulling(true);
- else if (cap == TEnableCap::DepthTest)
- m_state.SetDepthTest(true);
- }
- enum class TDepthFunc
- {
- Less,
- LessEqual,
- Greater,
- GreaterEqual,
- };
- void TSoftRenderer::DepthFunc(TDepthFunc func)
- {
- m_state.SetDepthFunc(func);
- }
如代码清单 2 所示,我们新增一个数组,用于充当深度缓冲区。并将缓冲区的大小设置成绘制屏幕的大小。
- class TRasterizer
- {
- private:
- uint32_t* m_pBits; // raw pixel data
- std::vector<float> m_depthBuffer; // depth buffer
- };
- TRasterizer::TRasterizer(uint32_t* pBits, int width, int height, TRenderState* m_state)
- : m_pBits(pBits),
- m_width(width),
- m_height(height),
- m_state(m_state),
- m_depthBuffer(width * height)
- {
- }
代码清单 3 是深度测试的具体实现。首先我们判断是否开启了深度测试,没开启的话,意味深度测试都会通过。接着我们定义各个深度比较枚举量实际对应的比较函数。然后我们用比较函数进行测试,如果通过就更新深度缓冲区中的值,并返回通过;否则就返回不通过。
- bool TRasterizer::DepthTest(int x, int y, float depth)
- {
- if (m_state->IsDepthTestEnabled() == false)
- return true;
- static const std::unordered_map<TDepthFunc, std::function<bool(float, float)>> depthFuncMap =
- {
- { TDepthFunc::Less, [](float depth, float storedDepth) { return depth < storedDepth; } },
- { TDepthFunc::LessEqual, [](float depth, float storedDepth) { return depth <= storedDepth; } },
- { TDepthFunc::Greater, [](float depth, float storedDepth) { return depth > storedDepth; } },
- { TDepthFunc::GreaterEqual, [](float depth, float storedDepth) { return depth >= storedDepth; } },
- };
- int index = y * m_width + x;
- auto it = depthFuncMap.find(m_state->GetDepthFunc());
- assert(it != depthFuncMap.end());
- if (it->second(depth, m_depthBuffer[index]))
- {
- m_depthBuffer[index] = depth;
- return true;
- }
- return false;
- }
如代码清单 4 所示,我们在光栅化阶段添加深度测试功能,如果没通过深度测试,就不绘制这个像素。注意,因为需要用到深度值,所以我们这边新增插值点的 z 坐标插值。
- void TRasterizer::RasterizeTriangle(
- const TVertexShaderOutputPrivate& v1,
- const TVertexShaderOutputPrivate& v2,
- const TVertexShaderOutputPrivate& v3,
- FragmentShaderFunction fragShader)
- {
- const tmath::Vec2i p1 = { (int)v1.position.x(), (int)v1.position.y() };
- const tmath::Vec2i p2 = { (int)v2.position.x(), (int)v2.position.y() };
- const tmath::Vec2i p3 = { (int)v3.position.x(), (int)v3.position.y() };
- int minX = std::min(p1.x(), std::min(p2.x(), p3.x()));
- int maxX = std::max(p1.x(), std::max(p2.x(), p3.x()));
- int minY = std::min(p1.y(), std::min(p2.y(), p3.y()));
- int maxY = std::max(p1.y(), std::max(p2.y(), p3.y()));
- tmath::Vec2i p, pp1, pp2, pp3;
- int c1, c2, c3;
- float alpha, beta, gamma;
- float interpInvW;
- float area = (float)std::abs(tmath::cross(p2 - p1, p3 - p1));
- TFragmentShaderOutput fragOutput;
- TVertexShaderOutput interpolatedInput;
- for (int i = minX; i <= maxX; i++)
- {
- p.x() = i;
- for (int j = minY; j <= maxY; j++)
- {
- p.y() = j;
- pp1.x() = p1.x() - p.x(); pp1.y() = p1.y() - p.y(); // pp1 = p1 - p;
- pp2.x() = p2.x() - p.x(); pp2.y() = p2.y() - p.y(); // pp2 = p2 - p;
- pp3.x() = p3.x() - p.x(); pp3.y() = p3.y() - p.y(); // pp3 = p3 - p;
- c1 = tmath::cross(pp1, pp2);
- c2 = tmath::cross(pp2, pp3);
- c3 = tmath::cross(pp3, pp1);
- if ((c1 >= 0 && c2 >= 0 && c3 >= 0) ||
- (c1 <= 0 && c2 <= 0 && c3 <= 0))
- {
- alpha = std::abs(c2) / area;
- beta = std::abs(c3) / area;
- gamma = std::abs(c1) / area;
- interpInvW = v1.invW * alpha + v2.invW * beta + v3.invW * gamma;
- interpolatedInput.position.z() = (
- v1.position.z() * alpha +
- v2.position.z() * beta +
- v3.position.z() * gamma
- );
- /**
- * 深度测试
- */
- if (DepthTest(i, j, interpolatedInput.position.z()) == false)
- continue;
- if (v1.useColor)
- {
- interpolatedInput.color = tmath::interpolate(
- v1.color, alpha,
- v2.color, beta,
- v3.color, gamma
- ) / interpInvW;
- fragShader(interpolatedInput, fragOutput);
- SetPixel(i, j, TRGBA::FromVec4f(fragOutput.color));
- }
- else
- {
- interpolatedInput.uv = tmath::interpolate(
- v1.uv, alpha,
- v2.uv, beta,
- v3.uv, gamma
- ) / interpInvW;
- switch (m_state->GetSampleMode())
- {
- case TSampleMode::Bilinear:
- SetPixel(i, j, SampleTextureBilinear(interpolatedInput.uv));
- break;
- case TSampleMode::Nearest:
- default:
- SetPixel(i, j, SampleTextureNearest(interpolatedInput.uv));
- break;
- }
- }
- }
- }
- }
- }
z 坐标插值不进行透视校正。一个原因是,不校正也“够用”了,不影响判断结果,减少计算量。
另一个原因是,OpenGL 中的深度值范围是 0 到 1。我们可以在 NDC 转屏幕坐标的时候进行转换。如果再校正,范围就不对了。
我们之前的屏幕变换矩阵,没有改变 z 值。所以,如代码清单 5 所示,我们把 z 值从 [-1,1] 映射到 [0,1]。
- template<typename T>
- Matrix<T, 4, 4> ScreenMatrix(int width, int height)
- {
- T halfWidth = static_cast<T>(width) / 2;
- T halfHeight = static_cast<T>(height) / 2;
- T halfDepth = static_cast<T>(1) / 2;
- return Matrix<T, 4, 4>({
- halfWidth, 0, 0, halfWidth,
- 0, -halfHeight, 0, halfHeight,
- 0, 0, halfDepth, halfDepth,
- 0, 0, 0, 1
- });
- }
3. 测试
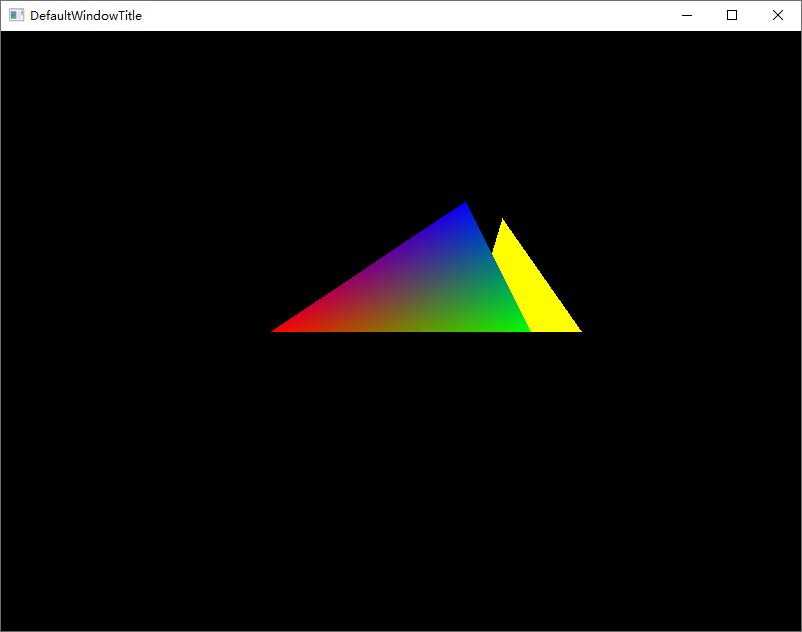
最后我们编写测试用例。如代码清单 6 所示,我们指定两个三角形,一个是渐变色的,在前面;另一个是纯色的,在后面。同时我们开启了深度测试,并指定 TDepthFunc::Less,即深度值小的在前面,会遮挡住后面深度值大的。
- TDepthTestRenderTask::TDepthTestRenderTask(TBasicWindow& win)
- {
- float vertices[] = {
- // 第一个三角形
- -0.5f, 0.0f, 0.0f,
- 0.5f, 0.0f, 0.0f,
- 0.25f, 0.5f, 0.0f,
- // 第二个三角形
- 0.3f, 0.0f, 0.3f,
- 0.8f, 0.0f, 0.3f,
- 0.45f, 0.5f, 0.3f,
- };
- float colors[] = {
- // 第一个三角形
- 1.0f, 0.0f, 0.0f, 1.0f,
- 0.0f, 1.0f, 0.0f, 1.0f,
- 0.0f, 0.0f, 1.0f, 1.0f,
- // 第二个三角形
- 1.0f, 1.0f, 0.0f, 1.0f,
- 1.0f, 1.0f, 0.0f, 1.0f,
- 1.0f, 1.0f, 0.0f, 1.0f,
- };
- uint32_t indices[] = {
- // 第一个三角形
- 0, 1, 2,
- // 第二个三角形
- 3, 4, 5,
- };
- ////
- sr.Enable(TEnableCap::DepthTest);
- sr.DepthFunc(TDepthFunc::Less);
- }
为了说明问题,如代码清单 7 所示,特意调用两次绘制函数。先画前面的,后画后面的。
- void TDepthTestRenderTask::Render(TSoftRenderer& sr)
- {
- sr.ClearColor({ 0,0,0 });
- sr.ClearDepth(1.0f);
- sr.DrawElements(TDrawMode::Triangles, 3, 0);
- sr.DrawElements(TDrawMode::Triangles, 3, 3 * sizeof(uint32_t));
- }
图 1 是测试结果,可以看到虽然后面的纯色三角形是后画的,但是开启了深度测试,还是能正确绘制遮挡关系。
本节完整代码见 tag/depth_test。