Lambertian 光照模型
在这篇文章中,我们继续使用自己开发的软件渲染流程,来实现 Lambertian 光照模型,并验证效果。
1. Lambertian 光照模型
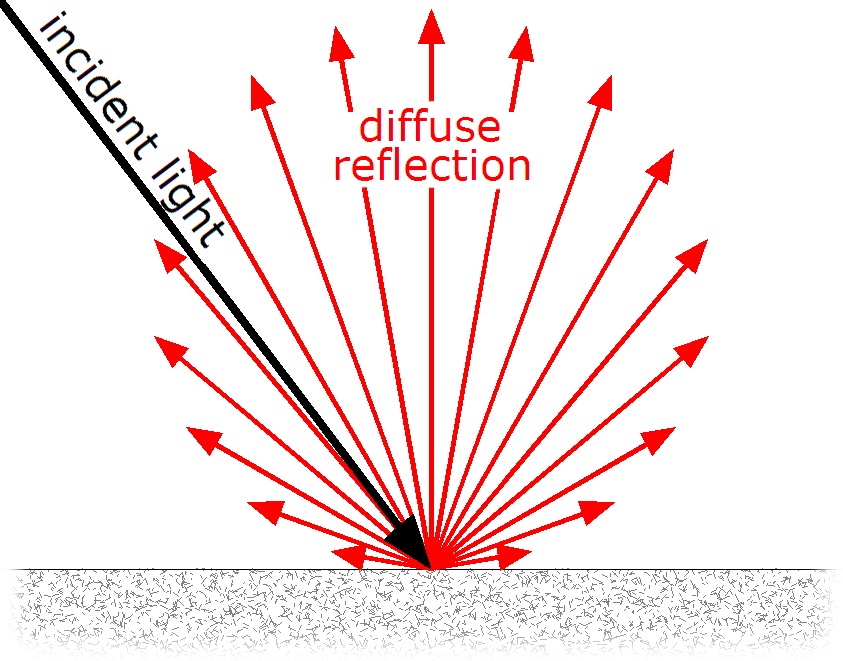
Lambertian 光照模型,主要用于模拟那些可以完全漫反射光线的表面。Lambertian 模型理解起来比较直观,表面的明暗是由表面法线与光线方向之间的角度决定的。
直观的点在于:光线垂直照射表面,最亮;平行照不到光,最暗。即,和角度的余弦相关。
如图 1 所示,在此次实验环境中,我们定义光线的方向就是照向表面的方向。所以,设法线为 N,光线方向为 L,那么光线作用的量为:
- dot(N,-L)
光线可能从背面,即 N 和 L 之间的角度大于 90 度,余弦值会为负。因为都是不贡献光照效果,所以不需要负数:
- max(dot(N,-L),0)
已经获取了光的“贡献量”,接着进行简单的反射颜色模拟。此处颜色采用 RGB 方式表示,光源颜色和物体表面颜色进行元素积操作(逐分量进行乘法操作),可以模拟反射光的颜色。
同样比较符合日常直觉:白光反射物体固有色;黑色物体不反射光;有颜色的光会影响物体的固有色。
我们设光线的颜色为 light_color,物体表面的颜色为 surface_color,可以得到反射光的颜色为:
- light_color × surface_color
再加上光的“贡献量”,可以得到最终看到的表面颜色:
- final_color = light_color × surface_color × max(dot(N,-L),0)
我们还能继续完善一下,我们不希望物体完全照不到光。可以增加一个比较暗的环境光,设为 ambient_color。那么,最终表面反射的颜色为:
- final_color = light_color × surface_color × max(dot(N,-L),0)
- + ambient_color × surface_color
2. 代码实现
在了解了 Lambertian 光照模型的理论之后,我们进行代码实现。如代码清单 1 所示,我们在顶点着色器中获取顶点位置、法线和 uv 坐标,并传递给后续片元着色器。
Lambertian 的具体实现逻辑在片段着色器中。我们首先获取到法线和 uv 坐标。根据 uv 坐标,可以得到表面的颜色值。光源的方向和颜色,以及环境光的颜色,在本次实现中都是常量。所以,公式中涉及的所有参数都“集齐”了,按照先前所讲的公式进行计算即可。
注意,最终的颜色值可能不在 0 到 1 范围内,我们使用 clamp 进行截断。
- void TLambertianShader::VertexShader(const TShaderContext& context, TVertexShaderOutput& output)
- {
- tmath::Vec3f position;
- context.GetAttribute(0, position);
- output.builtin_position = projectionMatrix * viewMatrix * modelMatrix * tmath::Vec4f(position, 1.0f);
- tmath::Vec3f normal;
- context.GetAttribute(1, normal);
- output.variables["normal"] = normal;
- tmath::Vec2f uv;
- context.GetAttribute(2, uv);
- output.variables["uv"] = uv;
- }
- void TLambertianShader::FragmentShader(
- const TShaderContext& context,
- const TVertexShaderOutput& input,
- TFragmentShaderOutput& output)
- {
- tmath::Vec3f normal = std::get<tmath::Vec3f>(input.variables.at("normal"));
- tmath::Vec2f uv = std::get<tmath::Vec2f>(input.variables.at("uv"));
- normal.Normalize();
- tmath::Vec4f surfaceColor = context.texture(uv);
- float NDotL = std::max(tmath::dot(normal, -lightDirection), 0.0f);
- tmath::Vec4f final_color = lightColor * surfaceColor * NDotL;
- final_color += ambientColor * surfaceColor;
- final_color =
- {
- std::clamp(final_color.x(), 0.0f, 1.0f),
- std::clamp(final_color.y(), 0.0f, 1.0f),
- std::clamp(final_color.z(), 0.0f, 1.0f),
- std::clamp(final_color.w(), 0.0f, 1.0f)
- };
- output.color = final_color;
- }
3. 测试
最后,我们编写测试用例,对实现的 Lambertian 效果进行验证。
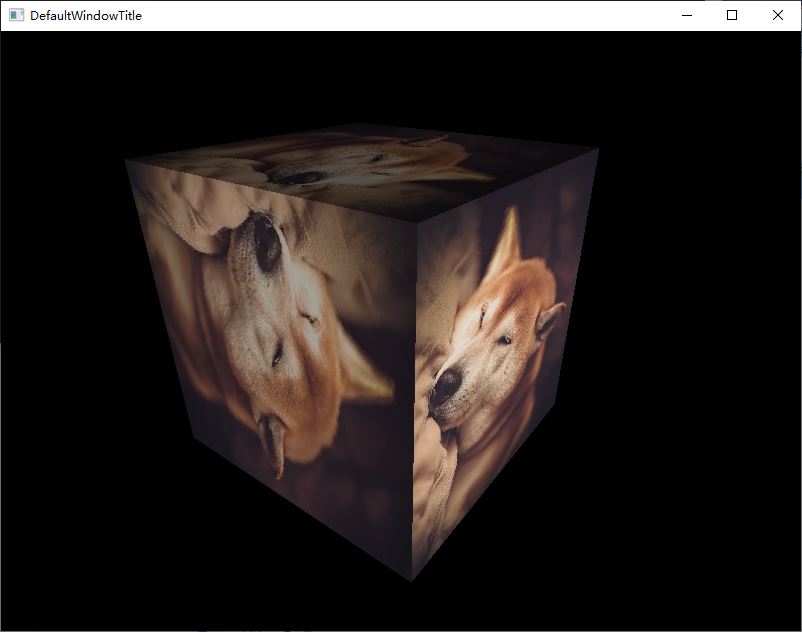
采用的场景还是贴图立方体,但是和之前的数据定义方式不同。之前立方体的三角形顶点是共用的,但是现在不行了。因为相同的顶点可能属于不同的面,所以它们的法线可能不同,需要单独指定。
如代码清单 2 所示,我们单独定义 12 个面,即 36 个点。vertices 有 36 行,太长,所以此处进行了省略。同时,vertices 采用交错格式,一个顶点数据包括位置、法线和 uv 坐标。
其余的操作都是之前接触过的接口。创建 vao 和 vbo。现在只需要创建一个 vbo,并指定三个 layout。指定纹理贴图。设置着色器 “uniform”。开启深度测试。引入摄像机模块。
- TLambertianRenderTask::TLambertianRenderTask(TBasicWindow& win)
- : m_camera(tmath::Vec3f(0.0f, 0.0f, -4.0f), tmath::Vec3f(0.0f, 0.0f, 0.0f))
- {
- float vertices[] = {
- // positions // normals // texture coords
- -0.5f, -0.5f, -0.5f, 0.0f, 0.0f, -1.0f, 0.0f, 0.0f,
- 0.5f, -0.5f, -0.5f, 0.0f, 0.0f, -1.0f, 1.0f, 0.0f,
- …… …… ……
- -0.5f, 0.5f, -0.5f, 0.0f, 1.0f, 0.0f, 0.0f, 1.0f
- };
- uint32_t indices[] =
- {
- 0, 1, 2, 3, 4, 5,
- 6, 7, 8, 9, 10, 11,
- 12,13,14,15,16,17,
- 18,19,20,21,22,23,
- 24,25,26,27,28,29,
- 30,31,32,33,34,35
- };
- TSoftRenderer& sr = win.GetRenderer();
- uint32_t vao, vbo, ebo;
- sr.GenVertexArrays(1, &vao);
- sr.BindVertexArray(vao);
- sr.GenBuffers(1, &vbo);
- sr.BindBuffer(TBufferType::ArrayBuffer, vbo);
- sr.BufferData(TBufferType::ArrayBuffer, sizeof(vertices), vertices);
- sr.VertexAttribPointer(0, 3, 8 * sizeof(float), 0);
- sr.VertexAttribPointer(1, 3, 8 * sizeof(float), 3 * sizeof(float));
- sr.VertexAttribPointer(2, 2, 8 * sizeof(float), 6 * sizeof(float));
- sr.GenBuffers(1, &ebo);
- sr.BindBuffer(TBufferType::ElementArrayBuffer, ebo);
- sr.BufferData(TBufferType::ElementArrayBuffer, sizeof(indices), indices);
- sr.PrintVAO(vao);
- ////
- uint32_t textureId;
- sr.GenTextures(1, &textureId);
- sr.BindTexture(textureId);
- TImage img("image/dog.jpg", TImage::ColorFormat::RGBA);
- sr.TexImage2D(img.GetWidth(), img.GetHeight(), img.GetData());
- sr.TexParameter(TTextureParam::WrapS, (int)TTextureWrapMode::Repeat);
- sr.TexParameter(TTextureParam::WrapT, (int)TTextureWrapMode::Repeat);
- sr.TexParameter(TTextureParam::Filter, (int)TTextureFilterMode::Nearest);
- ////
- int width = win.GetWindowWidth();
- int height = win.GetWindowHeight();
- float aspect = (float)width / height;
- m_shader.projectionMatrix = tmath::PerspectiveMatrix(tmath::degToRad(60.0f), aspect, 0.1f, 100.0f);
- m_shader.viewMatrix = tmath::TranslationMatrix(0.0f, 0.0f, 4.0f);
- m_shader.modelMatrix.ToIdentity();
- m_shader.lightDirection = { -1.0f, -0.3f, 0.7f };
- m_shader.lightDirection.Normalize();
- m_shader.lightColor = { 1.0f, 1.0f, 1.0f, 1.0f };
- m_shader.ambientColor = { 0.1f, 0.1f, 0.1f, 1.0f };
- sr.UseProgram(&m_shader);
- ////
- sr.Enable(TEnableCap::DepthTest);
- sr.DepthFunc(TDepthFunc::Less);
- ////
- win.AddInputHandler(&m_camera);
- }
- void TLambertianRenderTask::Render(TSoftRenderer& sr)
- {
- m_shader.viewMatrix = m_camera.GetViewMatrix();
- sr.ClearColor({ 0,0,0 });
- sr.ClearDepth(1.0f);
- sr.DrawElements(TDrawMode::Triangles, 36, 0);
- }
图 2 是运行的效果,光线设置从右侧打过来,可以看到效果正确。
本章的完整代码见 tag/lambertian。