
[ARM Linux系统移植] U-Boot 启动流程
1. u-boot.lds 链接脚本
程序的链接通过链接脚本控制。通过 u-boot.lds 链接脚本文件可以了解到 u-boot 各部分内容的组织顺序。通过 u-boot.map 文件可以更具体地了解到内存地映射情况。这两个文件都需要编译 u-boot 项目之后才会出现。
结合 u-boot.lds 和 u-boot.map 文件,可以得到如表 1 所示的标号地址分配。需要注意,表 1 中针对不同配置的 u-boot ,编译出来的地址不是固定的。
| 标号 | 地址 |
|---|---|
| __image_copy_start | 0x0000000087800000 |
| vectors | 0x0000000087800000 |
| __image_copy_end | 0x0000000087853720 |
| __rel_dyn_start | 0x0000000087853720 |
| __rel_dyn_end | 0x000000008785c3c0 |
| __end | 0x000000008785c3c0 |
| _image_binary_end | 0x000000008785c3c0 |
| __bss_start | 0x0000000087853720 |
| __bss_end | 0x000000008789e814 |
2. U-Boot 启动流程分析
从 u-boot.lds 中可以看出,程序的入口为 _start,位于 arch\arm\cpu\armv7\vectors.S 文件中。
一开始的程序跟着中断向量表,这部分知识在 [ARM裸机开发] GPIO中断 中已经介绍过了。我们重点关注 CPU 上电复位的 reset 函数,以了解 u-boot 的启动流程。
- _start:
- #ifdef CONFIG_SYS_DV_NOR_BOOT_CFG
- .word CONFIG_SYS_DV_NOR_BOOT_CFG
- #endif
- b reset
- ldr pc, _undefined_instruction
- ldr pc, _software_interrupt
- ldr pc, _prefetch_abort
- ldr pc, _data_abort
- ldr pc, _not_used
- ldr pc, _irq
- ldr pc, _fiq
2.1 reset 函数
reset 函数定义在 arch\arm\cpu\armv7\start.S 文件中,最终会调用到 save_boot_params_ret。第 43 至 49 行,如果不在 HYP 模式下,就设置为 SVC 模式,并关闭 FIQ 和 IRQ 中断。第 56 至 65 行,重新设置中断向量表的位置,将其设置在 _start 处。以上这些内容也都在 [ARM裸机开发] GPIO中断 中进行过说明。
第 69 行的 cpu_init_cp15 函数,功能为初始化 cp15 协处理器,这边不做深究。
后续我们依次分析第 70 行的 cpu_init_crit 函数,以及第 73 行的 _main 函数。
- reset:
- /* Allow the board to save important registers */
- b save_boot_params
- save_boot_params_ret:
- /*
- * disable interrupts (FIQ and IRQ), also set the cpu to SVC32 mode,
- * except if in HYP mode already
- */
- mrs r0, cpsr
- and r1, r0, #0x1f @ mask mode bits
- teq r1, #0x1a @ test for HYP mode
- bicne r0, r0, #0x1f @ clear all mode bits
- orrne r0, r0, #0x13 @ set SVC mode
- orr r0, r0, #0xc0 @ disable FIQ and IRQ
- msr cpsr,r0
- /*
- * Setup vector:
- * (OMAP4 spl TEXT_BASE is not 32 byte aligned.
- * Continue to use ROM code vector only in OMAP4 spl)
- */
- #if !(defined(CONFIG_OMAP44XX) && defined(CONFIG_SPL_BUILD))
- /* Set V=0 in CP15 SCTLR register - for VBAR to point to vector */
- mrc p15, 0, r0, c1, c0, 0 @ Read CP15 SCTLR Register
- bic r0, #CR_V @ V = 0
- mcr p15, 0, r0, c1, c0, 0 @ Write CP15 SCTLR Register
- /* Set vector address in CP15 VBAR register */
- ldr r0, =_start
- mcr p15, 0, r0, c12, c0, 0 @Set VBAR
- #endif
- /* the mask ROM code should have PLL and others stable */
- #ifndef CONFIG_SKIP_LOWLEVEL_INIT
- bl cpu_init_cp15
- bl cpu_init_crit
- #endif
- bl _main
2.2 cpu_init_crit 函数
可以看到 cpu_init_crit 函数内只是简单的调用了 lowlevel_init 函数。所以紧接着我们需要分析 lowlevel_init 函数。
- /*************************************************************************
- *
- * CPU_init_critical registers
- *
- * setup important registers
- * setup memory timing
- *
- *************************************************************************/
- ENTRY(cpu_init_crit)
- /*
- * Jump to board specific initialization...
- * The Mask ROM will have already initialized
- * basic memory. Go here to bump up clock rate and handle
- * wake up conditions.
- */
- b lowlevel_init @ go setup pll,mux,memory
- ENDPROC(cpu_init_crit)
lowlevel_init 函数在 arch\arm\cpu\armv7\lowlevel_init.S 文件中定义。
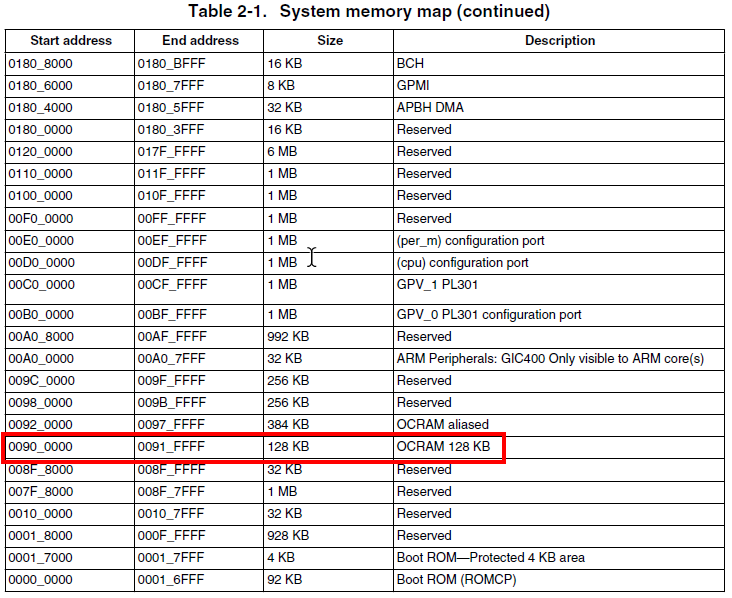
lowlevel_init.S 中第 22 至 23 行设置临时栈,值为 CONFIG_SYS_INIT_SP_ADDR,它在 include\configs\mx6ullevk.h 文件中定义。栈值的定义涉及很多个变量,看起来稍显繁琐。涉及到的变量有 SOC 内部 RAM 首地址(IRAM_BASE_ADDR)、内部 RAM 大小(IRAM_SIZE)以及和 global_data 结构体大小相关的变量(GENERATED_GBL_DATA_SIZE、GD_SIZE)。如图 1 所示,IRAM_BASE_ADDR 和 IRAM_SIZE 的值,也可以在 i.mux6ull 手册中得到验证。CONFIG_SYS_INIT_SP_ADDR 的值就是在内部 RAM 的末尾预留一些空间给 global_data 结构体。
- #define CONFIG_SYS_INIT_RAM_ADDR IRAM_BASE_ADDR
- #define CONFIG_SYS_INIT_RAM_SIZE IRAM_SIZE
- #define CONFIG_SYS_INIT_SP_OFFSET \
- (CONFIG_SYS_INIT_RAM_SIZE - GENERATED_GBL_DATA_SIZE)
- #define CONFIG_SYS_INIT_SP_ADDR \
- (CONFIG_SYS_INIT_RAM_ADDR + CONFIG_SYS_INIT_SP_OFFSET)
- #define IRAM_BASE_ADDR 0x00900000
- #if !(defined(CONFIG_MX6SX) || defined(CONFIG_MX6UL) || \
- defined(CONFIG_MX6SLL) || defined(CONFIG_MX6SL))
- #define IRAM_SIZE 0x00040000
- #else
- #define IRAM_SIZE 0x00020000
- #endif
- #define GENERATED_GBL_DATA_SIZE 256 /* (sizeof(struct global_data) + 15) & ~15 @ */
- #define GD_SIZE 248 /* sizeof(struct global_data) @ */
lowlevel_init.S 中第 34 至 36 行,再次预留 GD_SIZE 大小的空间,并把这段空间地址保存在 r9 寄存器中。至此为止,栈指针的变化如图 2 所示,首先是移动到 CONFIG_SYS_INIT_SP_ADDR,之后再移动 GD_SIZE 大小。
lowlevel_init.S 中第 42 至 58 行,保留现场后,调用 s_init 函数后,回复现场返回。s_init 函数中第一个判断就直接 return 了,实际上 “什么也没有做”。所以紧接着就需要分析 _main 函数了。
- ENTRY(lowlevel_init)
- /*
- * Setup a temporary stack. Global data is not available yet.
- */
- ldr sp, =CONFIG_SYS_INIT_SP_ADDR
- bic sp, sp, #7 /* 8-byte alignment for ABI compliance */
- #ifdef CONFIG_SPL_DM
- mov r9, #0
- #else
- /*
- * Set up global data for boards that still need it. This will be
- * removed soon.
- */
- #ifdef CONFIG_SPL_BUILD
- ldr r9, =gdata
- #else
- sub sp, sp, #GD_SIZE
- bic sp, sp, #7
- mov r9, sp
- #endif
- #endif
- /*
- * Save the old lr(passed in ip) and the current lr to stack
- */
- push {ip, lr}
- /*
- * Call the very early init function. This should do only the
- * absolute bare minimum to get started. It should not:
- *
- * - set up DRAM
- * - use global_data
- * - clear BSS
- * - try to start a console
- *
- * For boards with SPL this should be empty since SPL can do all of
- * this init in the SPL board_init_f() function which is called
- * immediately after this.
- */
- bl s_init
- pop {ip, pc}
- ENDPROC(lowlevel_init)
2.3 _main 函数
_main 函数位于 arch\arm\lib\crt0.S 文件中。_main 函数的执行序列为:
1. 为调用 board_init_f() 设置初始环境。此环境只提供一个栈和一个地方来存储 GD('global data') 结构,它们都位于一些现成的 RAM(SRAM、锁定的缓存、……)中。在这种情况下,global data 变量,不管是否初始化(BSS),都是不可用的;只有被初始化的常量数据可用。在调用 board_init_f 之前,GD 应该被清零。
2. 调用 board_init_f()。这个函数为从系统 RAM(DRAM、DDR、……)中执行而准备硬件。由于系统 RAM 可能还不可用,因此 board_init_f() 必须使用当前的 GD 来存储必须传递给后续阶段的一切数据。这些数据包括重定位目的地址、将来的栈和将来的 GD 位置。
3. 设置中间环境,其中的栈和 GD 是由 board_init_f() 在系统 RAM 中分配的,但是 BSS 和初始化的非常量数据仍然不可用。
4a. 对于 U-Boot 部分(不是 SPL),调用 relocate_code()。这个函数将 U-Boot 从当前位置重定位到由 board_init_f() 计算的重定位目的地址。
5. 为调用 board_init_r() 设置最终环境。此环境具有 BSS(初始化为 0)、初始化的非常量数据(初始化为它们的预期值)和系统 RAM 中的栈(对于 SPL 来说,将栈和 GD 移动到 RAM 中是可选的 —— 参见 CONFIG_SPL_STACK_R)。GD 保留了由 board_init_f() 设置的值。
6. 对于 U-Boot 部分(不是 SPL),一些 CPU 在内存方面还有一些工作要做,所以调用 c_runtime_cpu_setup。
7. 调用 board_init_r()。
2.3.1 设置初始环境
- #if defined(CONFIG_SPL_BUILD) && defined(CONFIG_SPL_STACK)
- ldr sp, =(CONFIG_SPL_STACK)
- #else
- ldr sp, =(CONFIG_SYS_INIT_SP_ADDR)
- #endif
- #if defined(CONFIG_CPU_V7M) /* v7M forbids using SP as BIC destination */
- mov r3, sp
- bic r3, r3, #7
- mov sp, r3
- #else
- bic sp, sp, #7 /* 8-byte alignment for ABI compliance */
- #endif
- mov r0, sp
- bl board_init_f_alloc_reserve
- mov sp, r0
- /* set up gd here, outside any C code */
- mov r9, r0
- bl board_init_f_init_reserve
这节内容对应于 _main 函数的第 1 个阶段,为 board_init_f() 的调用设置初始环境,对应 crt0.S 文件中第 73 至 90 行。首先又将栈值设为了 CONFIG_SYS_INIT_SP_ADDR。
接着会调用 board_init_f_alloc_reserve 函数,位于 common\init\board_init.c 文件中,第一个参数通过 r0 传递,值为当前栈值。函数的作用是分配一段空间给 malloc 用,同时预留一部分给 GD 用。最终会用函数的返回值更新 SP 指针,即此时的栈上空间如图 3 所示。同时此时的返回值也代表着 GD 结构的首地址,被记录在 r9 寄存器中。
- ulong board_init_f_alloc_reserve(ulong top)
- {
- /* Reserve early malloc arena */
- #if defined(CONFIG_SYS_MALLOC_F)
- top -= CONFIG_SYS_MALLOC_F_LEN;
- #endif
- /* LAST : reserve GD (rounded up to a multiple of 16 bytes) */
- top = rounddown(top-sizeof(struct global_data), 16);
- return top;
- }
最后会调用 board_init_f_init_reserve 函数,它也在 board_init.c 中定义。函数的作用是对 GD 结构清零,然后把先前分配给 malloc 的区域在 GD 的 malloc_base 成员中记录。需要注意的是 board_init.c 145 行的 gd 变量定义,如 arch\arm\include\asm\global_data.h 中的声明,gd 是一个全局变量,为 r9 寄存器里的内容,即 GD 的地址。
- #define DECLARE_GLOBAL_DATA_PTR register volatile gd_t *gd asm ("r9")
- void board_init_f_init_reserve(ulong base)
- {
- struct global_data *gd_ptr;
- #ifndef _USE_MEMCPY
- int *ptr;
- #endif
- /*
- * clear GD entirely and set it up.
- * Use gd_ptr, as gd may not be properly set yet.
- */
- gd_ptr = (struct global_data *)base;
- /* zero the area */
- #ifdef _USE_MEMCPY
- memset(gd_ptr, '\0', sizeof(*gd));
- #else
- for (ptr = (int *)gd_ptr; ptr < (int *)(gd_ptr + 1); )
- *ptr++ = 0;
- #endif
- /* set GD unless architecture did it already */
- #if !defined(CONFIG_ARM)
- arch_setup_gd(gd_ptr);
- #endif
- /* next alloc will be higher by one GD plus 16-byte alignment */
- base += roundup(sizeof(struct global_data), 16);
- /*
- * record early malloc arena start.
- * Use gd as it is now properly set for all architectures.
- */
- #if defined(CONFIG_SYS_MALLOC_F)
- /* go down one 'early malloc arena' */
- gd->malloc_base = base;
- /* next alloc will be higher by one 'early malloc arena' size */
- base += CONFIG_SYS_MALLOC_F_LEN;
- #endif
- }
2.3.2 board_init_f()
- mov r0, #0
- bl board_init_f
- void board_init_f(ulong boot_flags)
- {
- #ifdef CONFIG_SYS_GENERIC_GLOBAL_DATA
- /*
- * For some archtectures, global data is initialized and used before
- * calling this function. The data should be preserved. For others,
- * CONFIG_SYS_GENERIC_GLOBAL_DATA should be defined and use the stack
- * here to host global data until relocation.
- */
- gd_t data;
- gd = &data;
- /*
- * Clear global data before it is accessed at debug print
- * in initcall_run_list. Otherwise the debug print probably
- * get the wrong vaule of gd->have_console.
- */
- zero_global_data();
- #endif
- gd->flags = boot_flags;
- gd->have_console = 0;
- if (initcall_run_list(init_sequence_f))
- hang();
- #if !defined(CONFIG_ARM) && !defined(CONFIG_SANDBOX) && \
- !defined(CONFIG_EFI_APP)
- /* NOTREACHED - jump_to_copy() does not return */
- hang();
- #endif
- /* Light up LED1 */
- imx6_light_up_led1();
- }
这节内容对应于 _main 函数的第 2 个阶段,即调用 board_init_f()。board_init_f() 在 common\board_f.c 文件中被定义。主要看 board_f.c 中的第 1061 行,它会依次遍历 init_sequence_f 这个函数指针数组,并调用对应的函数。因为 init_sequence_f 这个数组非常大,所以这边就不给出了。
init_sequence_f 中的前半部函数会初始化一系列外设,比如串口、定时器等,这部分先暂不关注。这里主要关注后半部分对 DRAM 内存的分配,并绘制出相应的内存 “分配图”。
首先看 setup_dest_addr 这个函数,它确定 GD 结构体中的 ram_size、ram_top 和 relocaddr 成员。因为此时串口已经初始化好了,可以直接使用 printf 函数了,所以就不费劲心思分析了,直接把最后得到的值打印出来。打印的各个值如下,其中 ram_size 等于 0x20000000,即 512MB;ram_top 和 relocaddr 等于 0xA0000000,即 DRAM 首地址 0x80000000 + 0x20000000。
- ram_size = 0x20000000
- ram_top = 0xA0000000
- relocaddr = 0xA0000000
接着看 reserve_mmu 函数,它为 MMU 预留 0x4000 大小的内存。relocaddr 首先减到 0x9FFFC000,但还需要 64KB 对齐,即最终对齐到 0x9FFF0000。
- static int reserve_mmu(void)
- {
- /* reserve TLB table */
- gd->arch.tlb_size = PGTABLE_SIZE;
- gd->relocaddr -= gd->arch.tlb_size;
- /* round down to next 64 kB limit */
- gd->relocaddr &= ~(0x10000 - 1);
- gd->arch.tlb_addr = gd->relocaddr;
- debug("TLB table from %08lx to %08lx\n", gd->arch.tlb_addr,
- gd->arch.tlb_addr + gd->arch.tlb_size);
- return 0;
- }
接着看 reserve_uboot 函数,它为 u-boot 预留内存,并进行对齐。
- static int reserve_uboot(void)
- {
- /*
- * reserve memory for U-Boot code, data & bss
- * round down to next 4 kB limit
- */
- gd->relocaddr -= gd->mon_len;
- gd->relocaddr &= ~(4096 - 1);
- #ifdef CONFIG_E500
- /* round down to next 64 kB limit so that IVPR stays aligned */
- gd->relocaddr &= ~(65536 - 1);
- #endif
- debug("Reserving %ldk for U-Boot at: %08lx\n", gd->mon_len >> 10,
- gd->relocaddr);
- gd->start_addr_sp = gd->relocaddr;
- return 0;
- }
接着看 reserve_malloc 函数,它为 malloc 区域预留 0x1002000 大小的内存。
- static int reserve_malloc(void)
- {
- gd->start_addr_sp = gd->start_addr_sp - TOTAL_MALLOC_LEN;
- debug("Reserving %dk for malloc() at: %08lx\n",
- TOTAL_MALLOC_LEN >> 10, gd->start_addr_sp);
- return 0;
- }
接着看 reserve_board 函数,它为板载信息预留内存空间。板载信息对应的 bd_t 结构体,大小为 80 字节。
- static int reserve_board(void)
- {
- if (!gd->bd) {
- gd->start_addr_sp -= sizeof(bd_t);
- gd->bd = (bd_t *)map_sysmem(gd->start_addr_sp, sizeof(bd_t));
- memset(gd->bd, '\0', sizeof(bd_t));
- debug("Reserving %zu Bytes for Board Info at: %08lx\n",
- sizeof(bd_t), gd->start_addr_sp);
- }
- return 0;
- }
接着看 reserve_global_data 函数,它为新的 GD 结构体预留内存空间,GD 结构体的大小为 248 字节。新的 GD 结构体存在 new_gd 成员中。
- static int reserve_global_data(void)
- {
- gd->start_addr_sp -= sizeof(gd_t);
- gd->new_gd = (gd_t *)map_sysmem(gd->start_addr_sp, sizeof(gd_t));
- debug("Reserving %zu Bytes for Global Data at: %08lx\n",
- sizeof(gd_t), gd->start_addr_sp);
- return 0;
- }
接着看 reserve_stacks 函数,它首先分配出 16 字节的内存,然后再进行 16 字节对齐。在 arch_reserve_stacks 函数中会为 irq 分配相应栈,这边再次留了 16 字节用于 abort 栈。
- static int reserve_stacks(void)
- {
- /* make stack pointer 16-byte aligned */
- gd->start_addr_sp -= 16;
- gd->start_addr_sp &= ~0xf;
- /*
- * let the architecture-specific code tailor gd->start_addr_sp and
- * gd->irq_sp
- */
- return arch_reserve_stacks();
- }
接着在 display_new_sp 函数里会打印目前最新的栈帧值,以此可以核对上述中是否有遗漏跟内存分配相关的函数。
- static int display_new_sp(void)
- {
- debug("New Stack Pointer is: %08lx\n", gd->start_addr_sp);
- return 0;
- }
接着看 setup_reloc 函数,它会设置 reloc_off 变量,并将目前 GD 结构体中的内容复制到 new_gd 中。
- static int setup_reloc(void)
- {
- if (gd->flags & GD_FLG_SKIP_RELOC) {
- debug("Skipping relocation due to flag\n");
- return 0;
- }
- #ifdef CONFIG_SYS_TEXT_BASE
- gd->reloc_off = gd->relocaddr - CONFIG_SYS_TEXT_BASE;
- #ifdef CONFIG_M68K
- /*
- * On all ColdFire arch cpu, monitor code starts always
- * just after the default vector table location, so at 0x400
- */
- gd->reloc_off = gd->relocaddr - (CONFIG_SYS_TEXT_BASE + 0x400);
- #endif
- #endif
- memcpy(gd->new_gd, (char *)gd, sizeof(gd_t));
- debug("Relocation Offset is: %08lx\n", gd->reloc_off);
- debug("Relocating to %08lx, new gd at %08lx, sp at %08lx\n",
- gd->relocaddr, (ulong)map_to_sysmem(gd->new_gd),
- gd->start_addr_sp);
- return 0;
- }
至此和内存分配相关的内容已经说明完毕,最终形成的内存分配图如图 4 所示,需要关注 relocaddr、bd、new_gd 和 start_addr_sp 这几个成员。需要说明的是,除了 u-boot 在内存中的大小会因为代码的不同导致不一致以外,其他区域的大小都是固定的,即相对位置都是一致的。
2.3.3 relocate_code()
这节对应 _main 函数的第 3 和第 4 个阶段。
首先第 3 阶段会重新设置栈指针以及新的 GD 结构地址,这些地址空间已经在上一节的 board_init_f 函数中分配好了,对着图 4 可以清楚的了解到。
第 3 阶段的代码如下所示,又回到了 crt0.S 文件中。第 103 行至 110 行设置新的栈指针。第 111 行获取到新的 bd 结构的首地址;如图 4 所示,新 bd 前面紧跟着新 gd,所以第 112 行更新 r9 寄存器为全新的 GD 结构体。
- /*
- * Set up intermediate environment (new sp and gd) and call
- * relocate_code(addr_moni). Trick here is that we'll return
- * 'here' but relocated.
- */
- ldr sp, [r9, #GD_START_ADDR_SP] /* sp = gd->start_addr_sp */
- #if defined(CONFIG_CPU_V7M) /* v7M forbids using SP as BIC destination */
- mov r3, sp
- bic r3, r3, #7
- mov sp, r3
- #else
- bic sp, sp, #7 /* 8-byte alignment for ABI compliance */
- #endif
- ldr r9, [r9, #GD_BD] /* r9 = gd->bd */
- sub r9, r9, #GD_SIZE /* new GD is below bd */
- adr lr, here
- ldr r0, [r9, #GD_RELOC_OFF] /* r0 = gd->reloc_off */
- add lr, lr, r0
- #if defined(CONFIG_CPU_V7M)
- orr lr, #1 /* As required by Thumb-only */
- #endif
第 4 阶段重定位 u-boot,将其重新移动到 relocaddr 处。对应的函数为 relocate_code,它在 relocate.S 文件中定义。
- ldr r0, [r9, #GD_RELOCADDR] /* r0 = gd->relocaddr */
- b relocate_code
relocate_code 函数如下所示,主要分为两部分作用:第一部分作用是移动 u-boot 镜像,对应第 80 行至 89 行,这部分比较容易理解;第二部分作用是修复 .rel.dyn 段,使全局数据的访问能正常进行。大致的思路为,通过 .rel.dyn 段定位到存储全局变量地址所在空间的地址(类似二级指针),将存储的全局变量的地址值加上偏移就达到了“修复”的效果,具体的讲解放在附录Ⅰ中。
- ENTRY(relocate_code)
- ldr r1, =__image_copy_start /* r1 <- SRC &__image_copy_start */
- subs r4, r0, r1 /* r4 <- relocation offset */
- beq relocate_done /* skip relocation */
- ldr r2, =__image_copy_end /* r2 <- SRC &__image_copy_end */
- copy_loop:
- ldmia r1!, {r10-r11} /* copy from source address [r1] */
- stmia r0!, {r10-r11} /* copy to target address [r0] */
- cmp r1, r2 /* until source end address [r2] */
- blo copy_loop
- /*
- * fix .rel.dyn relocations
- */
- ldr r2, =__rel_dyn_start /* r2 <- SRC &__rel_dyn_start */
- ldr r3, =__rel_dyn_end /* r3 <- SRC &__rel_dyn_end */
- fixloop:
- ldmia r2!, {r0-r1} /* (r0,r1) <- (SRC location,fixup) */
- and r1, r1, #0xff
- cmp r1, #23 /* relative fixup? */
- bne fixnext
- /* relative fix: increase location by offset */
- add r0, r0, r4
- ldr r1, [r0]
- add r1, r1, r4
- str r1, [r0]
- fixnext:
- cmp r2, r3
- blo fixloop
- relocate_done:
2.3.4 relocate_vectors() 等
这一节对应 _main 函数的第 5 和 6 两个阶段。首先是重定位中断向量表,如下代表所示,对应 relocate_vectors 函数。之后调用 c_runtime_cpu_setup 函数,在此开发板上并没有做什么事情。再往后是 bss 段的清零工作,这部分比较简单,便不再赘述了。
- #ifdef CONFIG_HAS_VBAR
- /*
- * If the ARM processor has the security extensions,
- * use VBAR to relocate the exception vectors.
- */
- ldr r0, [r9, #GD_RELOCADDR] /* r0 = gd->relocaddr */
- mcr p15, 0, r0, c12, c0, 0 /* Set VBAR */
2.3.5 board_init_r()
board_init_r() 函数定义在 common\board_r.c 文件中。它的形式和 board_init_f() 函数一样,都是循环遍历一个函数指针数组,并调用对应的函数。这个函数指针数组为 init_sequence_r,它的内容同样很多,多和设备相关。这边我们暂只关注最后调用的 run_main_loop 函数,它实现了 u-boot 里面的命令行模式。
- void board_init_r(gd_t *new_gd, ulong dest_addr)
- {
- ……
- if (initcall_run_list(init_sequence_r))
- hang();
- ……
- }
2.3.5.1 run_main_loop()
从如下摘录的代码中可以看到,run_main_loop() 函数中调用了 main_loop() 函数。main_loop() 函数,目前我们只关注第 68 行开始的内容。
- static int run_main_loop(void)
- {
- #ifdef CONFIG_SANDBOX
- sandbox_main_loop_init();
- #endif
- /* main_loop() can return to retry autoboot, if so just run it again */
- for (;;)
- main_loop();
- return 0;
- }
- void main_loop(void)
- {
- const char *s;
- ……
- s = bootdelay_process();
- if (cli_process_fdt(&s))
- cli_secure_boot_cmd(s);
- autoboot_command(s);
- cli_loop();
- }
先看 main_loop() 中第 68 至 72 行的代码,它实现了 u-boot 初始界面中倒计时那部分的逻辑。
首先简要看一下 bootdelay_process 函数的作用,它首先获取界面倒计时的时间(第 326 - 327 行),然后将其存储在全局变量 stored_bootdelay 中(第 375 行)。然后函数会返回 bootcmd 环境变量中的字符串(第 365 行),即如果倒计时之前按下了任意键,就进入命令行模式,否则执行 bootcmd 环境变量中的命令。
- const char *bootdelay_process(void)
- {
- char *s;
- int bootdelay;
- ……
- s = getenv("bootdelay");
- bootdelay = s ? (int)simple_strtol(s, NULL, 10) : CONFIG_BOOTDELAY;
- ……
- } else
- #endif /* CONFIG_BOOTCOUNT_LIMIT */
- s = getenv("bootcmd");
- ……
- stored_bootdelay = bootdelay;
- return s;
- }
接下来简要看一下,程序在倒计时这块的逻辑。这块逻辑对应 autoboot_command 函数,主要是第 384 行这个判断,其中起关键作用的就是 abortboot 函数。abortboot 函数中会调用延迟函数以及 getc 函数,来判断规定时间(stored_bootdelay)之前是否发生了按键输入。如果规定时间内没有按键输入则执行 bootcmd 里的命令(第 389 行)。
- void autoboot_command(const char *s)
- {
- debug("### main_loop: bootcmd=\"%s\"\n", s ? s : "<UNDEFINED>");
- if (stored_bootdelay != -1 && s && !abortboot(stored_bootdelay)) {
- ……
- run_command_list(s, -1, 0);
- ……
- }
- ……
- }
2.3.5.1.1 cli_loop()
如果在倒计时之前按下了任意键,就会进入命令行模式,而 cli_loop() 函数就对应了命令的循环处理。cli_loop() 的调用栈如下:
- └─cli_loop
- └─parse_file_outer
- └─parse_stream_outer
- ├─parse_stream
- └─run_list
- └─run_list_real
- └─run_pipe_real
- └─cmd_process
cli_loop() 函数经过层层的处理,把输入字符串转化成对应的参数,最终调用 cmd_process() 函数。从 cmd_process() 函数的调用参数,就能大致了解到输入的字符串需要进行如何的转化。在看 cmd_process() 函数之前,让我们先看看各个 “命令” 是如何组织和定义的。
- enum command_ret_t cmd_process(int flag, int argc, char * const argv[],
- int *repeatable, ulong *ticks)
- {
- enum command_ret_t rc = CMD_RET_SUCCESS;
- cmd_tbl_t *cmdtp;
- /* Look up command in command table */
- cmdtp = find_cmd(argv[0]);
- if (cmdtp == NULL) {
- printf("Unknown command '%s' - try 'help'\n", argv[0]);
- return 1;
- }
- /* found - check max args */
- if (argc > cmdtp->maxargs)
- rc = CMD_RET_USAGE;
- #if defined(CONFIG_CMD_BOOTD)
- /* avoid "bootd" recursion */
- else if (cmdtp->cmd == do_bootd) {
- if (flag & CMD_FLAG_BOOTD) {
- puts("'bootd' recursion detected\n");
- rc = CMD_RET_FAILURE;
- } else {
- flag |= CMD_FLAG_BOOTD;
- }
- }
- #endif
- /* If OK so far, then do the command */
- if (!rc) {
- if (ticks)
- *ticks = get_timer(0);
- rc = cmd_call(cmdtp, flag, argc, argv);
- if (ticks)
- *ticks = get_timer(*ticks);
- *repeatable &= cmdtp->repeatable;
- }
- if (rc == CMD_RET_USAGE)
- rc = cmd_usage(cmdtp);
- return rc;
- }
各个 “命令” 是通过 U_BOOT_CMD 宏来进行定义的。可以看到这个宏的定义略显复杂,所以这边举一个实际的例子来对 U_BOOT_CMD 宏进行展开,达到理解的作用。
- #define U_BOOT_CMD_MKENT_COMPLETE(_name, _maxargs, _rep, _cmd, \
- _usage, _help, _comp) \
- { #_name, _maxargs, _rep, _cmd, _usage, \
- _CMD_HELP(_help) _CMD_COMPLETE(_comp) }
- #define U_BOOT_CMD_MKENT(_name, _maxargs, _rep, _cmd, _usage, _help) \
- U_BOOT_CMD_MKENT_COMPLETE(_name, _maxargs, _rep, _cmd, \
- _usage, _help, NULL)
- #define U_BOOT_CMD_COMPLETE(_name, _maxargs, _rep, _cmd, _usage, _help, _comp) \
- ll_entry_declare(cmd_tbl_t, _name, cmd) = \
- U_BOOT_CMD_MKENT_COMPLETE(_name, _maxargs, _rep, _cmd, \
- _usage, _help, _comp);
- #define U_BOOT_CMD(_name, _maxargs, _rep, _cmd, _usage, _help) \
- U_BOOT_CMD_COMPLETE(_name, _maxargs, _rep, _cmd, _usage, _help, NULL)
我们以 dhcp 这个命令为例,在代码中可以看到,能否使用这些命令,是通过相应的宏来控制的。
- #if defined(CONFIG_CMD_DHCP)
- static int do_dhcp(cmd_tbl_t* cmdtp, int flag, int argc, char* const argv[])
- {
- return netboot_common(DHCP, cmdtp, argc, argv);
- }
- U_BOOT_CMD(
- dhcp, 3, 1, do_dhcp,
- "boot image via network using DHCP/TFTP protocol",
- "[loadAddress] [[hostIPaddr:]bootfilename]"
- );
- #endif
将 dhcp 相应的宏展开,可以看到得到了一个 cmd_tbl_t 结构体,里面的 cmd 成员就对应的相应命令的处理函数。
- cmd_tbl_t _u_boot_list_2_cmd_2_dhcp __aligned(4) __attribute__((unused,
- section(".u_boot_list_2_""cmd""_2_""dhcp"))) =
- {
- "dhcp",
- 3,
- 1,
- do_dhcp,
- "boot image via network using DHCP/TFTP protocol",
- "[loadAddress] [[hostIPaddr:]bootfilename]",
- NULL,
- };
gcc -E 可以得到展开内容。
- struct cmd_tbl_s {
- char *name; /* Command Name */
- int maxargs; /* maximum number of arguments */
- int repeatable; /* autorepeat allowed? */
- /* Implementation function */
- int (*cmd)(struct cmd_tbl_s *, int, int, char * const []);
- char *usage; /* Usage message (short) */
- #ifdef CONFIG_SYS_LONGHELP
- char *help; /* Help message (long) */
- #endif
- #ifdef CONFIG_AUTO_COMPLETE
- /* do auto completion on the arguments */
- int (*complete)(int argc, char * const argv[], char last_char, int maxv, char *cmdv[]);
- #endif
- };
dhcp 命令的结构体声明中,可以看到有一个 section 属性,它规定变量存放的节。相关节可以在链接脚本中看到,所有 .u_boot_list 打头的节都归并于 .u_boot_list 处,强制保留(KEEP),并且按名称字符串排序(SORT)。
- .u_boot_list : {
- KEEP(*(SORT(.u_boot_list*)));
此时,我们回过头来看 cmd_process 函数:第 507 行的 find_cmd() 函数,在 .u_boot_list 相应节中按 name 成员变量遍历寻找所在结构体。之后在 cmd_call() 函数中调用对应处理函数,其中也就是使用了 cmd 成员变量。
3. 总结
本篇文章大致分析了一下 u-boot 的启动流程,以 reset 复位中断为起点进行分析。首先是前期的各种准备工作,此时重点关注内存的布局,以及 GD 这个结构体,其中记录了各种内存布局相关地址变量。之后 u-boot 会把自身代码移到高地址处,并在高地址处运行。再接着会进行最终环境的设置,比如初始化各种设备。最后,文章分析了一下 u-boot 进入命令行模式这块的逻辑。
附录Ⅰ .rel.dyn 段的实验分析
在节 2.3.3 中有提到 .rel.dyn 段的修复,在此附录中,将结合实验对其作用进行说明。首先我们在 mx6ullevk.c 文件中添加自己的函数和全局变量,以便了解到代码是如何定位到它们的。
- static int my_test_val = 0;
- void my_test_func(void)
- {
- my_test_val = 100;
- printf("my_test_func\n");
- }
- int board_init(void)
- {
- my_test_func();
添加好代码,并且编译好之后,使用 objdump 命令进行反汇编:
- >arm-linux-gnueabihf-objdump -D -m arm u-boot > u-boot.dis
- 8785375c: 00000000 andeq r0, r0, r0
可以得到如下反汇编结果。其中函数的调用通过 bl 指令调用,而 bl 指令本身就是基于偏移、位置无关的,所以我们重点看全局变量的定位。全局变量的使用发生在自己定义的 my_test_func 函数里,它首先通过 pc 偏移定位到标签(位于 87804308),而标签地址处的值(0x8785375c)就是 my_test_val 全局变量的地址。由此,我们可以看到,当代码进行了重定位之后,更改标签地址处(87804308)的值,比直接修改指令来的简单的多,并且更容易定位和管理。
- 8785375c <my_test_val>:
- 8785375c: 00000000 andeq r0, r0, r0
- 878042f4 <my_test_func>:
- 878042f4: e59f300c ldr r3, [pc, #12] ; 87804308 <my_test_func+0x14>
- 878042f8: e3a02064 mov r2, #100 ; 0x64
- 878042fc: e59f0008 ldr r0, [pc, #8] ; 8780430c <my_test_func+0x18>
- 87804300: e5832000 str r2, [r3]
- 87804304: ea00da07 b 8783ab28 <printf>
- 87804308: 8785375c ; <UNDEFINED> instruction: 0x8785375c
- 8780430c: 87843a27 strhi r3, [r4, r7, lsr #20]
- 87804310 <board_init>:
- 87804310: e92d41f0 push {r4, r5, r6, r7, r8, lr}
- 87804314: e3a06007 mov r6, #7
- 87804318: ebfffff5 bl 878042f4 <my_test_func>
“定位和管理”就体现在,所有标签的地址都存储在 .rel.dyn 段中。从以下段中的内容中可以看到,每个项占 8 个字节:低 4 字节存储的就是标签所在的地址,可以通过它修改对应的全局变量的地址;高 4 字节标记地址的类型,这个例子中为 0x17。
- 87853d90: 87804308 strhi r4, [r0, r8, lsl #6]
- 87853d94: 00000017 andeq r0, r0, r7, lsl r0