[ARM Linux 驱动开发] 按键输入实验
本篇文章介绍按键驱动的编写,以此巩固时隔已久的 pinctrl 和 gpio 子系统知识点(距离 [ARM Linux 驱动开发] 借助 pinctrl 和 gpio 子系统编写 LED 驱动 快一个月了)。
同时值得又写一篇文章的原因是,输入型的驱动我们之前没有接触过,在实验的过程中,我们会发现许多问题。这边先把问题抛出,后续会一一解决,目前只简单实现功能。
pinctrl 和 gpio 设备树设置
首先我们需要在设备树文件中配置按键相关的 pinctrl 和 gpio 设置,同样我们在之前移植的 arch/arm/boot/dts/imx6ull-my-emmc.dts 文件中进行修改。
如代码清单 1 所示,在 /iomuxc/imx6ul-evk 节点内的最后,添加我们的按键设置:设置 GPIO 复用和电气属性。
- &iomuxc {
- pinctrl-names = "default";
- pinctrl-0 = <&pinctrl_hog_1>;
- imx6ul-evk {
- /* ………… */
- pinctrl_mykey: mykey {
- fsl,pins = <
- MX6UL_PAD_UART1_CTS_B__GPIO1_IO18 0xf080
- >;
- };
- };
- };
如代码清单 2 所示,在根节点内的最后,添加我们的按键节点。其中 pinctrl-0 属性指向前面的按键 pinctrl 设置;key-gpio 属性指定 GPIO 组,后续 gpio 子系统的 gpio_request 操作函数会使用到。
- / {
- model = "Freescale i.MX6 ULL 14x14 EVK Board";
- compatible = "fsl,imx6ull-14x14-evk", "fsl,imx6ull";
- /* ………… */
- hanhankey {
- #address-cells = <1>;
- #size-cells = <1>;
- compatible = "hanhan-key";
- pinctrl-names = "default";
- pinctrl-0 = <&pinctrl_mykey>;
- key-gpio = <&gpio1 18 GPIO_ACTIVE_LOW>;
- status = "okay";
- };
- };
驱动代码
按键驱动代码如清单 3 所示,基本框架已经介绍过很多次了。我们关注到 keyio_init 函数,其中通过 of_find_node_by_path 读取到我们的按键节点信息(第 73 行);使用得到的按键节点,通过 of_get_named_gpio 得到 gpio 子系统中的 gpio 编号,之后 gpio 的操作都是基于此编号(第 80 行);gpio_request 申请此 gpio,已检查此 gpio 是否被占用,第二个参数是给此 gpio 起的名字(第 88 行);gpio_direction_input 设置 gpio 为输入(第 95 行)。
再看到 key_read 文件操作函数,注意此篇文章需要实现 read 函数了。gpio 的值通过 gpio_get_value 函数读取。这边我们检测到按键按下后,还等待其弹起。按键点击了,我们返回一个值,没有点击我们返回另一个值。
- #include <linux/types.h>
- #include <linux/module.h>
- #include <linux/cdev.h>
- #include <linux/device.h>
- #include <linux/fs.h>
- #include <asm/io.h>
- #include <asm/uaccess.h>
- #include <linux/of.h>
- #include <linux/slab.h>
- #include <linux/of_address.h>
- #include <linux/of_gpio.h>
- #define LED_CNT 1
- #define LED_NAME "mykey"
- struct KeyDev
- {
- /* 设备号相关 */
- dev_t devId;
- int major;
- int minor;
- /* cdev */
- struct cdev cdev;
- /* mdev */
- struct class* class;
- struct device* device;
- /* GPIO 编号 */
- int gpioKey;
- };
- struct KeyDev keyDev;
- static int key_open(struct inode* inode, struct file* filp)
- {
- printk("led_open\n");
- return 0;
- }
- static int key_release(struct inode* inode, struct file* filp)
- {
- printk("led_release\n");
- return 0;
- }
- ssize_t key_read(struct file* file, char __user* buf, size_t size, loff_t* ppos)
- {
- int val, res;
- if (gpio_get_value(keyDev.gpioKey) == 0)
- {
- while (gpio_get_value(keyDev.gpioKey) == 0); /* 等待按键释放 */
- val = 0xFF;
- }
- else
- {
- val = 0;
- }
- res = copy_to_user(buf, &val, sizeof(val));
- return res;
- }
- const struct file_operations led_fops =
- {
- .owner = THIS_MODULE,
- .open = key_open,
- .release = key_release,
- .read = key_read,
- };
- static int keyio_init(void)
- {
- int res;
- struct device_node* nd = of_find_node_by_path("/hanhankey");
- if (nd == NULL)
- {
- printk("of_find_node_by_path failed\n");
- return -EINVAL;
- }
- keyDev.gpioKey = of_get_named_gpio(nd, "key-gpio", 0);
- if (keyDev.gpioKey < 0)
- {
- printk("of_get_named_gpio failed\n");
- return -EINVAL;
- }
- printk("key gpio = %d\n", keyDev.gpioKey);
- res = gpio_request(keyDev.gpioKey, "key0");
- if (res != 0)
- {
- printk("gpio_request failed\n");
- return -EINVAL;
- }
- gpio_direction_input(keyDev.gpioKey);
- return 0;
- }
- static int key_init(void)
- {
- int res;
- res = keyio_init();
- if (res != 0)
- return res;
- /////////////////////////////////////////////////////////////
- /* 注册设备号 */
- if (keyDev.major)
- {
- keyDev.devId = MKDEV(keyDev.major, keyDev.minor);
- register_chrdev_region(keyDev.devId, LED_CNT, LED_NAME);
- }
- else
- {
- alloc_chrdev_region(&keyDev.devId, 0, LED_CNT, LED_NAME);
- keyDev.major = MAJOR(keyDev.devId);
- keyDev.minor = MINOR(keyDev.devId);
- }
- printk("major = %d, minor = %d\n", keyDev.major, keyDev.minor);
- /* 设置 cdev */
- keyDev.cdev.owner = THIS_MODULE;
- cdev_init(&keyDev.cdev, &led_fops);
- cdev_add(&keyDev.cdev, keyDev.devId, LED_CNT);
- /* 设置 mdev */
- keyDev.class = class_create(THIS_MODULE, LED_NAME);
- if (IS_ERR(keyDev.class))
- {
- return PTR_ERR(keyDev.class);
- }
- keyDev.device = device_create(keyDev.class, NULL, keyDev.devId, NULL, LED_NAME);
- if (IS_ERR(keyDev.device))
- {
- return PTR_ERR(keyDev.device);
- }
- return 0;
- }
- static void key_exit(void)
- {
- device_destroy(keyDev.class, keyDev.devId);
- class_destroy(keyDev.class);
- cdev_del(&keyDev.cdev);
- unregister_chrdev_region(keyDev.devId, LED_CNT);
- /* 释放 GPIO */
- gpio_free(keyDev.gpioKey);
- }
- module_init(key_init);
- module_exit(key_exit);
- MODULE_LICENSE("GPL");
- MODULE_AUTHOR("hanhan");
验证测试
代码清单 4 是我们编写的测试程序,这里我们一直循环读取按键状态,如果按下就打印出信息。
- #include <sys/types.h>
- #include <sys/stat.h>
- #include <fcntl.h>
- #include <unistd.h>
- #include <stdio.h>
- int main()
- {
- int i;
- int fd = open("/dev/mykey", O_RDWR);
- if (fd < 0)
- {
- printf("open failed\n");
- return -1;
- }
- int buf = -1;
- while (1)
- {
- read(fd, &buf, sizeof(buf));
- if (buf == 0xff)
- printf("Trigger\n");
- }
- end_proc:
- close(fd);
- }
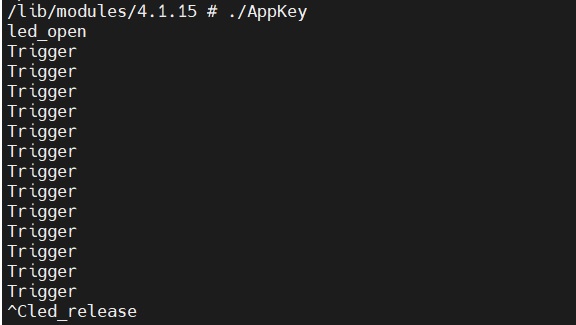
图 1 是打印的信息,当按下按键,就会有提示信息产生。
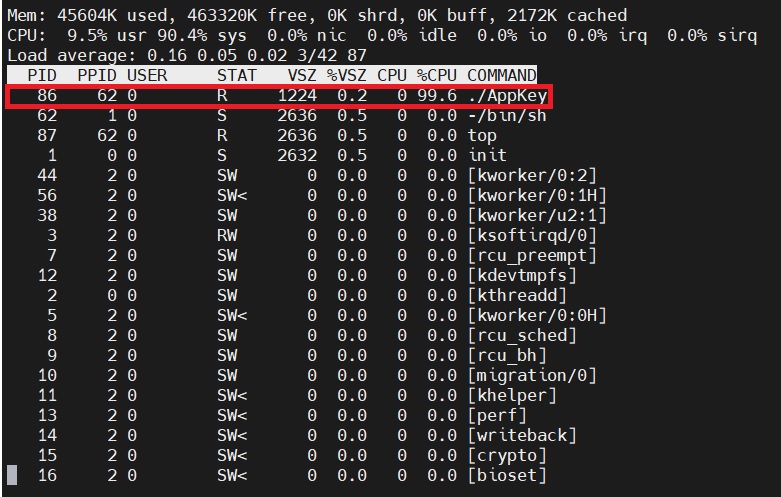
但是当前的程序存在问题,我们通过 top 命令可以看到测试应用程序的 CPU 占用率高达 99.6%。这是由于循环频繁读取所导致的,后续会介绍“新技术”来解决这一问题。