
[ARM Linux 驱动开发] 第一个字符设备驱动
从本篇文章开始,我们就步入 linux 驱动学习的阶段了。这篇文章会编写一个“虚拟”的字符设备驱动。说是虚拟的原因是,这个驱动在日常功能上几乎没有什么实际作用,主要是为了了解字符设备的框架,为后续的知识打下基础。
环境准备
首先我们需要移植好的 linux 内核,驱动部分不需要移植好,因为我们后续就是来学习 linux 驱动的。这部分可以参照文章 [ARM Linux系统移植] Linux 内核移植 。
我们还需要一个通过 nfs 网络加载的根文件系统,方便验证编译好的程序,而不用频繁刷机。这部分可以参照文章 [ARM Linux系统移植] 根文件系统构建。
VSCode 配置
我们新建一个 VSCode 项目用来写 linux 驱动,因为编写 linux 驱动需要使用内核代码中的头文件,所以为了写代码时能有交互提示,我们需要设置项目包含的头文件目录。
在项目上按 Crtl+Shift+P 键,之后选择 C/C++: Edit configurations(JSON),便会生成一个 c_cpp_properties.json 配置文件。我们在 "includePath" 项下添加以下内容:
- {
- "configurations": [
- {
- "name": "Linux",
- "includePath": [
- "${workspaceFolder}/**",
- "/home/tim/ori_linux/linux-imx-rel_imx_4.1.15_2.1.0_ga/include",
- "/home/tim/ori_linux/linux-imx-rel_imx_4.1.15_2.1.0_ga/arch/arm/include",
- "/home/tim/ori_linux/linux-imx-rel_imx_4.1.15_2.1.0_ga/arch/arm/include/generated"
- ],
- "defines": [],
- "compilerPath": "/usr/bin/gcc",
- "cStandard": "gnu17",
- "cppStandard": "gnu++14",
- "intelliSenseMode": "linux-gcc-x64"
- }
- ],
- "version": 4
- }
即添加了 linux 源码下的 include、arch/arm/include 和 arch/arm/include/generated 路径。
一、 加载和卸载函数
驱动模块有加载和卸载两种操作,在编写驱动的时候需要注册这两种函数。module_init 宏用来向 linux 内核注册模块加载函数;module_exit 宏用来向 linux 内核注册模块卸载函数。
加载和卸载函数的原型定义,我们可以参考 linux 源码中其他驱动的实现,编写代码如下:
- #include <linux/module.h>
- static int __init chrdevbase_init(void)
- {
- printk("chrdevbase_init\n");
- return 0;
- }
- static void __exit chrdevbase_exit(void)
- {
- printk("chrdevbase_exit\n");
- }
- module_init(chrdevbase_init);
- module_exit(chrdevbase_exit);
- MODULE_LICENSE("GPL");
- MODULE_AUTHOR("hanhanblog");
其中,我们在加载和卸载函数中加了打印信息,便于实验观察。printk() 函数可以理解成内核态的 printf 函数。在上述代码的 17、18 行,我们还定义了许可规则和作者,以满足基本的编译和加载条件。
二、 驱动实验
第一节中的代码已经满足驱动程序的最基本要求了,所以我们可以针对它进行实验了,以进一步感受加载和卸载函数。
首先需要编译驱动程序,编写如下 Makefile:
- KERNELDIR := /home/tim/ori_linux/linux-imx-rel_imx_4.1.15_2.1.0_ga
- CURRENT_PATH := $(shell pwd)
- obj-m := chrdevbase.o
- build: kernel_modules
- kernel_modules:
- $(MAKE) -C $(KERNELDIR) M=$(CURRENT_PATH) modules
- clean:
- $(MAKE) -C $(KERNELDIR) M=$(CURRENT_PATH) clean
linux 源码的顶层 Makefile 在文章 [ARM Linux系统移植] Linux 顶层 Makefile 分析 中有介绍,这边也能大致理解这个模块 Makefile 的含义:这个 Makefile 主要是借助 linux 源码的编译环境,-C 选项用于转到指定目录下编译;M 选项指定模块所在目录;modules 目标指定是编译模块;obj-m 变量应该是“依附”的源码环境。
接着我们执行
- > make ARCH=arm CROSS_COMPILE=arm-linux-gnueabihf-
命令,即可完成模块的编译。最终我们需要用到 chrdevbase.ko 这个编译出来的文件。
linux 加载和卸载模块命令
有两个命令可以加载驱动模块:insmod 和 modprobe。insmod 模块不能解决模块之间的依赖关系,而 modprobe 可以,所以教程中推荐我们使用 modprobe 来加载模块,即使这个模块没有依赖。
与之对应的卸载模块命令是:rmmod 和 modprobe -r。
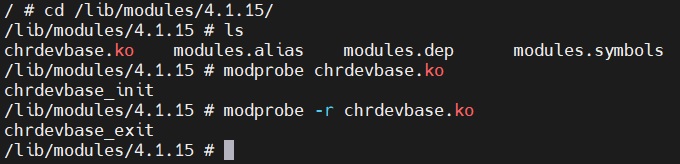
modprobe 命令会自动在模块目录下搜索指定的模块文件,当前开发板使用的目录是 /lib/modules/4.1.15,所以我们需要现在文件系统中新建这个目录。
如何确定 "/lib/modules/4.1.15" 这个目录名称?可以直接输入 modprobe 命令,如果没有这个目录,会有相应的提示。
首次使用 modprobe 命令加载模块,会提示
- > modprobe: can't open 'modules.dep': No such file or directory
这样的错误。需要再执行一下 depmod 命令,就会生成相应的 modules.dep 文件。
将 chrdevbase.ko 拷贝到开发板上的 /lib/modules/4.1.15 目录,执行模块加载和卸载命令就能看到图 1 所示的预期打印信息。
三、 字符设备注册与注销
字符设备驱动模块加载时,还需要注册字符设备。同样,卸载时也需要注销字符设备。字符设备的注册和注销的函数原型如下:
- static inline int register_chrdev(unsigned int major, const char *name,
- const struct file_operations *fops);
- static inline void unregister_chrdev(unsigned int major, const char *name);
其中的 major 参数指定主设备号,register_chrdev 注册的字符设备占用全部子设备号。name 参数指定字符设备名称。fops 参数是文件操作结构体,这将在第四节中进行说明。
在进行注册之前,我们需要使用
- > cat /proc/devices
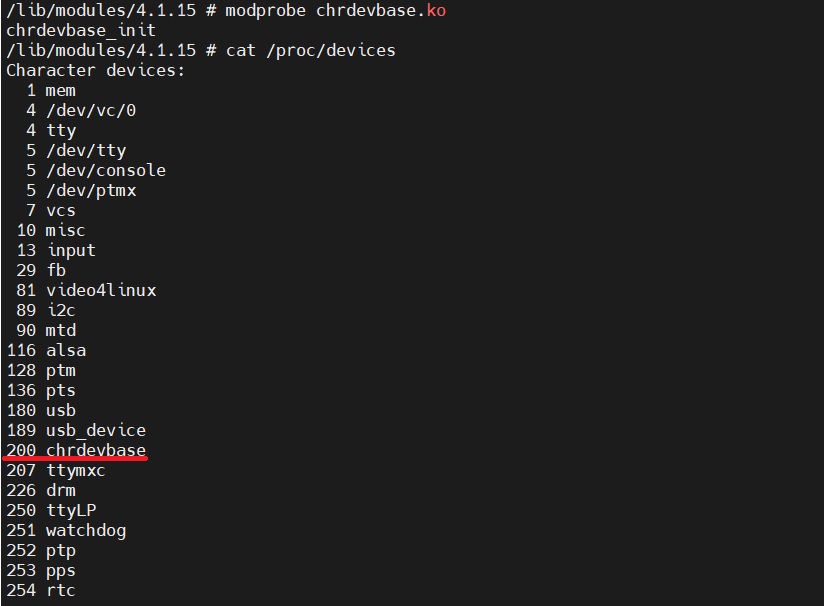
命令查看当前字符设备已分配的主设备号,新注册的主设备号不能重复。本例子中使用 "200",当前环境下确认过没有被注册。现在我们再次扩充之前写的模块代码:
- #include <linux/module.h>
- #include <linux/fs.h>
- const struct file_operations chrdevbase_fops;
- static int __init chrdevbase_init(void)
- {
- int ret = -1;
- ret = register_chrdev(200, "chrdevbase", &chrdevbase_fops);
- if (ret < 0)
- {
- printk("register_chrdev failed\n");
- }
- printk("chrdevbase_init\n");
- return 0;
- }
- static void __exit chrdevbase_exit(void)
- {
- unregister_chrdev(200, "chrdevbase");
- printk("chrdevbase_exit\n");
- }
- module_init(chrdevbase_init);
- module_exit(chrdevbase_exit);
- MODULE_LICENSE("GPL");
- MODULE_AUTHOR("hanhanblog");
其中在模块加载和卸载函数中,分别添加了字符设备的注册和注销函数。file_operations 结构体先暂且“留空”。
按照第二节的内容进行模块的加载,再查看 /proc/devices。图 2 中可以看到,我们的字符设备成功注册。
四、 实现文件操作函数
在第三章中我们预留了 file_operations 结构体没有完善。常听到的一句话“linux 中一切皆文件”,字符设备也是,也可以像文件一样对其进行操作。我们看到 file_operations 结构体的定义:
- struct file_operations {
- struct module *owner;
- loff_t (*llseek) (struct file *, loff_t, int);
- ssize_t (*read) (struct file *, char __user *, size_t, loff_t *);
- ssize_t (*write) (struct file *, const char __user *, size_t, loff_t *);
- ssize_t (*read_iter) (struct kiocb *, struct iov_iter *);
- ssize_t (*write_iter) (struct kiocb *, struct iov_iter *);
- int (*iterate) (struct file *, struct dir_context *);
- unsigned int (*poll) (struct file *, struct poll_table_struct *);
- long (*unlocked_ioctl) (struct file *, unsigned int, unsigned long);
- long (*compat_ioctl) (struct file *, unsigned int, unsigned long);
- int (*mmap) (struct file *, struct vm_area_struct *);
- int (*mremap)(struct file *, struct vm_area_struct *);
- int (*open) (struct inode *, struct file *);
- int (*flush) (struct file *, fl_owner_t id);
- int (*release) (struct inode *, struct file *);
- int (*fsync) (struct file *, loff_t, loff_t, int datasync);
- int (*aio_fsync) (struct kiocb *, int datasync);
- int (*fasync) (int, struct file *, int);
- int (*lock) (struct file *, int, struct file_lock *);
- ssize_t (*sendpage) (struct file *, struct page *, int, size_t, loff_t *, int);
- unsigned long (*get_unmapped_area)(struct file *, unsigned long, unsigned long, unsigned long, unsigned long);
- int (*check_flags)(int);
- int (*flock) (struct file *, int, struct file_lock *);
- ssize_t (*splice_write)(struct pipe_inode_info *, struct file *, loff_t *, size_t, unsigned int);
- ssize_t (*splice_read)(struct file *, loff_t *, struct pipe_inode_info *, size_t, unsigned int);
- int (*setlease)(struct file *, long, struct file_lock **, void **);
- long (*fallocate)(struct file *file, int mode, loff_t offset,
- loff_t len);
- void (*show_fdinfo)(struct seq_file *m, struct file *f);
- #ifndef CONFIG_MMU
- unsigned (*mmap_capabilities)(struct file *);
- #endif
- };
其中可以看到许多之前在文件操作中遇到的函数名称。file_operations 中的函数不用全部实现,这里的示例我们实现 open、release、read 和 write 函数。
例子主要实现的功能为,可以从驱动模块的读缓冲区中读取内容,也可以往模块中的写缓冲区写内容。内存操作涉及到的函数为 copy_to_user() 和 copy_from_user()。实现(完善)的代码如下:
- #include <linux/module.h>
- #include <linux/fs.h>
- #include <asm/uaccess.h>
- char readbuf[100] = "Hello App\n";
- char writebuf[100];
- int chrdevbase_open(struct inode* inode, struct file* filp)
- {
- printk("chrdevbase_open\n");
- return 0;
- }
- int chrdevbase_release(struct inode *inode, struct file *filp)
- {
- printk("chrdevbase_release\n");
- return 0;
- }
- ssize_t chrdevbase_read(struct file* file, char __user* buf, size_t count, loff_t* ppos)
- {
- //printk("chrdevbase_read E: cnt = %d, %s\n", count, readbuf);
- int ret = -1;
- ret = copy_to_user(buf, readbuf, count <= sizeof(readbuf) ? count : sizeof(readbuf));
- if (ret)
- {
- printk("copy_to_user error\n");
- }
- //printk("chrdevbase_read X\n");
- return 0;
- }
- ssize_t chrdevbase_write(struct file* file, const char __user* buf, size_t count, loff_t* ppos)
- {
- int ret = -1;
- ret = copy_from_user(writebuf, buf, count <= sizeof(writebuf) ? count : sizeof(writebuf));
- if (ret)
- {
- printk("copy_from_user error\n");
- }
- else
- {
- printk("%s", writebuf);
- }
- return 0;
- }
- const struct file_operations chrdevbase_fops =
- {
- .owner = THIS_MODULE,
- .open = chrdevbase_open,
- .release = chrdevbase_release,
- .read = chrdevbase_read,
- .write = chrdevbase_write,
- };
- static int __init chrdevbase_init(void)
- {
- int ret = -1;
- ret = register_chrdev(200, "chrdevbase", &chrdevbase_fops);
- if (ret < 0)
- {
- printk("register_chrdev failed\n");
- }
- printk("chrdevbase_init\n");
- return 0;
- }
- static void __exit chrdevbase_exit(void)
- {
- unregister_chrdev(200, "chrdevbase");
- printk("chrdevbase_exit\n");
- }
- module_init(chrdevbase_init);
- module_exit(chrdevbase_exit);
- MODULE_LICENSE("GPL");
- MODULE_AUTHOR("hanhanblog");
五、 编写测试应用程序
第四章就已经完成了本篇文章驱动模块部分的全部内容了,现在我们需要写一个用户态的应用程序来验证编写的驱动模块的正确性。
由于我们需要以文件的形式操作驱动模块,但是此时加载完驱动模块后,并没有与之对应的设备节点文件,因此输入以下命令进行创建:
- > mknod /dev/chrdevbase c 200 0
其中,/dev/chrdevbase 是需要创建的节点文件;c 选项表示创建是字符设备;200 是主设备号;0 是次设备号。
创建好字符设备节点文件之后,我们就可以像平常文件一样操作它了。编写的程序如下:
- #include <sys/types.h>
- #include <sys/stat.h>
- #include <fcntl.h>
- #include <unistd.h>
- #include <assert.h>
- #include <stdio.h>
- char readbuf[100];
- char writebuf[100] = "Hello Kernel\n";
- int main()
- {
- setvbuf(stdout, (char *)NULL, _IONBF, 0);
- int fd = open("/dev/chrdevbase", O_RDWR);
- assert(fd >= 0);
- int ret;
- ret = read(fd, readbuf, sizeof(readbuf));
- assert(ret >= 0);
- fflush(stdout);
- printf("read %d : %s", ret, readbuf);
- fflush(stdout);
- sleep(5);
- ret = write(fd, writebuf, sizeof(writebuf));
- assert(ret >= 0);
- ret = close(fd);
- assert(ret >= 0);
- }
像 open、read 这些应用层的库函数,可以直接通过 man 命令获取到需要引入的头文件以及其他详细的函数说明,非常方便。
实现的功能比较简单:首先打开设备文件;之后从设备文件中读取内容,并将读取到的内容打印出来;接着往设备文件写内容;最后关闭设备文件。
测试验证
编译编写的应用代码:
- > arm-linux-gnueabihf-gcc chrdevbaseApp.c -o chrdevbaseApp
将编译好的程序在开发板上运行,如图 3 所示,打印内容符合预期。
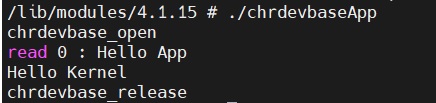
自己实验过程中,printf 和 printk 的打印内容不知为何会错位(重叠、覆盖)。按照网上试了好多方法:即时输出、刷新输出缓冲区,均不见效。
最后也只是 sleep 延时了一下,虽然结果输出满足预期,但也不是解决问题的方法。
六、 总结
本篇文章通过一个“虚拟”的字符设备,让我们了解了字符设备最小的框架。涉及到的内容也比较“琐碎”,因此文章也是采取一步一步完善递进的逻辑来组织的。总结需要关注的步骤:
1. 驱动模块需要定义加载和卸载函数。
2. 需要注册和注销驱动设备:分配设备号。
3. 实现各个文件操作函数 —— file_operations。
4. 通过 modprobe 命令加载模块;modprobe -r 卸载模块。
5. 通过 mknod 创建设备节点文件。
在本文说明的以上步骤中,也可以看出一些不太“合理”的地方:设备号需要自己验证并分配;需要自己创建设备节点文件。在后续的学习进程,这些方面应该都会得到完善,让我们继续学习!